Interacting with JavaScript in MoonBit: A First Look

· 13 min read


Introduction

In today's software world, no programming language ecosystem can be an isolated island. As an emerging general-purpose language, MoonBit's success in the vast technological landscape hinges on its seamless integration with existing ecosystems.

MoonBit provides multiple compilation backends, including JavaScript, which opens the door to the vast JavaScript ecosystem. This integration capability greatly expands MoonBit's application scenarios for both front-end browser development and Node.js applications. It allows developers to leverage the type safety and high performance of MoonBit while reusing a wide range of existing JavaScript libraries.

In this article, using Node.js as our example, we'll explore MoonBit's JavaScript FFI step-by-step. We'll cover various topics from basic function calls to complex type and error handling, demonstrating how to build an elegant bridge between the MoonBit and JavaScript worlds.

Prerequisites

Before we begin, let's configure our project. If you don't have an existing project, you can use the moon new tool to create a new MoonBit project.

To let the MoonBit toolchain know that our target platform is JavaScript, we need to add the following content to the moon.mod.json file in the project's root directory:

{
  "preferred-target": "js"
}

This configuration tells the compiler to use the JavaScript backend by default when executing commands like moon build or moon check. Of course, if you want to specify it temporarily on the command line, you can achieve the same effect with the --target=js option.

Building the Project

After completing the above configuration, simply run the familiar build command in the project's root directory:

> moon build

After the command executes successfully, since our project includes an executable entry by default, you can find the build artifacts in the target/js/debug/build/ directory. MoonBit conveniently generates three files for us:

  • .js file: The compiled JavaScript source code.
  • .js.map file: A Source Map file for debugging.
  • .d.ts file: A TypeScript declaration file, which is convenient for integration into TypeScript projects.

First JavaScript API Call

MoonBit's FFI design is principled and consistent. Similar to calling into C or other languages, we define an external function through a declaration with the extern keyword:

extern "js" fn consoleLog(msg : String) -> Unit = "(msg) => console.log(msg)"

This line of code is the core of enabling our FFI call. Let's break it down:

  • extern "js": Declares that this is an external function pointing to the JavaScript environment.

  • fn consoleLog(msg : String) -> Unit: This is the function's type signature in MoonBit. It accepts a parameter of type String and returns a unit value (Unit).

  • "(msg) => console.log(msg)": The string literal on the right side of the equals sign is the essence of this declaration, containing the native JavaScript function to be executed.

    Here, we use a concise arrow function. The MoonBit compiler will embed this code as is into the final generated .js file, enabling the call from MoonBit to JavaScript.

    Tip If your JavaScript code snippet is relatively complex, you can use the #| syntax to define multi-line strings to improve readability.

Once this FFI declaration is ready, we can call consoleLog in our MoonBit code just like a normal function:

test "hello" {
  consoleLog("Hello from JavaScript!")
}

Run moon test, and you will see the message printed by JavaScript's console.log in the console. Our first bridge is successfully built!

Interfacing with JavaScript Types

Establishing the call flow is just the first step. The real challenge lies in handling type differences between the two languages. MoonBit is a statically typed language, while JavaScript is dynamically typed. Establishing a safe and reliable type mapping between them is a key consideration in FFI design.

Below, we'll cover how to interface with different JavaScript types in MoonBit, starting from the easiest cases.

JavaScript Types Requiring No Conversion

The simplest case involves types in MoonBit whose underlying compiled representation in JavaScript corresponds directly to a native JavaScript type. In this case, we can pass them directly without any conversion.

The common "zero-cost" interface types are shown below:

MoonBit TypeCorresponding JavaScript Type
Stringstring
Boolboolean
Int, UInt, Float, Doublenumber
BigIntbigint
BytesUint8Array
Array[T]Array<T>
Function TypeFunction

Based on these mappings, we can bind many simple JavaScript functions. In fact, in the previous example of binding the console.log function, we have already used the correspondence between the String type in MoonBit and the string type in JavaScript.

Note: Maintaining the Internal Invariants of MoonBit Types

A crucial detail is that all of MoonBit's standard numeric types (Int, Float, etc.) map to the number type in JavaScript, i.e., IEEE 754 double-precision floating-point numbers. This means that when an integer value crosses the FFI boundary into JavaScript, its behavior will follow floating-point semantics, which may lead to unexpected results from MoonBit's perspective, such as differences in integer overflow behavior:

extern "js" fn incr(x : Int) -> Int = "(x) => x + 1"

test "incr" {
  // In MoonBit, @int.max_value + 1 will overflow and wrap around
  inspect(@int.max_value + 1, content="-2147483648")
  // In JavaScript, it is treated as a floating-point number and does not overflow
  inspect(incr(@int.max_value), content="2147483648") // ???
}

This is essentially illegal because, according to the internal invariant of the Int type in MoonBit, its value cannot be 2147483648 (which exceeds the maximum value allowed by the type). This may cause unexpected behavior in other MoonBit code downstream that relies on this point. Similar issues may arise when handling other data types across the FFI boundary, so please be sure to pay attention to this when writing related logic.

External JavaScript Types

Of course, the JavaScript world is much richer than these basic types. We will quickly encounter undefined, null, symbol, and various complex host objects, which have no direct counterparts in MoonBit.

For this situation, MoonBit provides the #external annotation. This annotation acts as a contract, telling the compiler: "Please trust me, this type actually exists in the external world (JavaScript). You don't need to care about its internal structure, just treat it as an opaque handle."

For example, we can define a type that represents JavaScript's undefined like this:

#external
type Undefined

extern "js" fn Undefined::new() -> Self = "() => undefined"

However, a standalone Undefined type isn't very useful, as undefined typically appears as part of a union type, like string | undefined.

A more practical approach is to create an Optional[T] type that precisely maps to T | undefined in JavaScript, and which can be easily converted to and from MoonBit's built-in Option[T] (aliased as T?).

To achieve this, we first need a type to represent any JavaScript value, similar to TypeScript's any. This is where #external is useful:

#external
pub type Value

Consequently, we need methods to get the undefined value and to check if a given value is undefined:

extern "js" fn Value::undefined() -> Value =
  #| () => undefined

extern "js" fn Value::is_undefined(self : Self) -> Bool =
  #| (n) => Object.is(n, undefined)

For easier debugging, we'll implement the Show trait for our Value type, allowing it to be printed:

pub impl Show for Value with output(self, logger) {
  logger.write_string(self.to_string())
}

pub extern "js" fn Value::to_string(self : Value) -> String =
  #| (self) =>
  #|   self === undefined ? 'undefined'
  #|     : self === null ? 'null'
  #|     : self.toString()

Next comes the 'magic' of the conversion process. We'll define two special conversion functions:

fn[T] Value::cast_from(value : T) -> Value = "%identity"

fn[T] Value::cast(self : Self) -> T = "%identity"

What is %identity

%identity is a special intrinsic provided by MoonBit for zero-cost type casting. It performs type checking at compile time, but has no effect at runtime. It essentially tells the compiler: "Trust me, I know the real type of this value; just treat it as the target type."

This is a double-edged sword: it provides powerful expressiveness at the FFI boundary, but misuse can break type safety. Therefore, its use should be strictly limited to a FFI-related scope.

With these building blocks, we can construct Optional[T]:

#external
type Optional[_] // Corresponds to T | undefined

/// Create an undefined Optional
fn[T] Optional::undefined() -> Optional[T] {
  Value::undefined().cast()
}

/// Check if an Optional is undefined
fn[T] Optional::is_undefined(self : Optional[T]) -> Bool {
  self |> Value::cast_from |> Value::is_undefined
}

/// Unwrap T from Optional[T], panic if it is undefined
fn[T] Optional::unwrap(self : Self[T]) -> T {
  guard !self.is_undefined() else { abort("Cannot unwrap an undefined value") }
  Value::cast_from(self).cast()
}

/// Convert Optional[T] to MoonBit's built-in T?
fn[T] Optional::to_option(self : Optional[T]) -> T? {
  guard !Value::cast_from(self).is_undefined() else { None }
  Some(Value::cast_from(self).cast())
}

/// Create Optional[T] from MoonBit's built-in T?
fn[T] Optional::from_option(value : T?) -> Optional[T] {
  guard value is Some(v) else { Optional::undefined() }
  Value::cast_from(v).cast()
}

test "Optional from and to Option" {
  let optional = Optional::from_option(Some(3))
  inspect(optional.unwrap(), content="3")
  inspect(optional.is_undefined(), content="false")
  inspect(optional.to_option(), content="Some(3)")
  let optional : Optional[Int] = Optional::from_option(None)
  inspect(optional.is_undefined(), content="true")
  inspect(optional.to_option(), content="None")
}

With this setup, we've successfully crafted a safe and ergonomic representation for T | undefined within MoonBit's type system. The same method can also be used to interface with other JavaScript-specific types like null, symbol, RegExp, etc.

Handling JavaScript Errors

A robust FFI layer must handle errors gracefully. By default, if JavaScript code throws an exception during an FFI call, it won't be caught by MoonBit's try-catch mechanism. Instead, it will crash the entire program:

// This is an FFI call that will throw an exception
extern "js" fn boom_naive() -> Value raise = "(u) => undefined.toString()"

test "boom_naive" {
  // This code will directly crash the test process instead of returning a `Result` via `try?`
  inspect(try? boom_naive()) // failed: TypeError: Cannot read properties of undefined (reading 'toString')
}

The correct approach is to wrap the call in a try...catch block on the JavaScript side, and then pass either the successful result or the caught error back to MoonBit. While we could do this directly in the JavaScript code of our extern "js" declaration, a more reusable solution exists:

First, let's define an Error_ type to encapsulate JavaScript errors:

suberror Error_ Value

pub impl Show for Error_ with output(self, logger) {
  logger.write_string("@js.Error: ")
  let Error_(inner) = self
  logger.write_object(inner)
}

Next, we'll define a core FFI wrapper function, Error_::wrap_ffi. Its role is to execute an operation (op) in the JavaScript realm and, depending on the outcome, call either a success (on_ok) or error (on_error) callback:

extern "js" fn Error_::wrap_ffi(
  op : () -> Value,
  on_ok : (Value) -> Unit,
  on_error : (Value) -> Unit,
) -> Unit =
  #| (op, on_ok, on_error) => { try { on_ok(op()); } catch (e) { on_error(e); } }

Finally, using this FFI function and MoonBit closures, we can create a more idiomatic Error_::wrap function that returns a T raise Error_:

fn[T] Error_::wrap(
  op : () -> Value,
  map_ok~ : (Value) -> T = Value::cast,
) -> T raise Error_ {
  // Define a variable to pass the result in and out of the closure
  let mut res : Result[Value, Error_] = Ok(Value::undefined())
  // Call the FFI, passing two closures that will modify the value of res based on the JS execution result
  Error_::wrap_ffi(op, fn(v) { res = Ok(v) }, fn(e) { res = Err(Error_(e)) })
  // Check the value of res and return the corresponding result or throw an error
  match res {
    Ok(v) => map_ok(v)
    Err(e) => raise e
  }
}

Now, we can safely call the function that previously threw an exception, and we can handle possible errors with pure MoonBit code:

extern "js" fn boom() -> Value = "(u) => undefined.toString()"

test "boom" {
  let result = try? Error_::wrap(boom)
  inspect(
    (result : Result[Value, Error_]),
    content="Err(@js.Error: TypeError: Cannot read properties of undefined (reading 'toString'))",
  )
}

Interfacing with External JavaScript APIs

Having mastered the key techniques for bridging types and handling errors, it's time to turn our attention to the wider world: the Node.js and NPM ecosystem. The entry point to all of it is a binding for the require() function:

extern "js" fn require_ffi(path : String) -> Value = "(path) => require(path)"

/// A more convenient wrapper that supports chained property access, e.g., require("a", keys=["b", "c"])
pub fn require(path : String, keys~ : Array[String] = []) -> Value {
  keys.fold(init=require_ffi(path), Value::get_with_string)
}

// ... where the definition of Value::get_with_string is as follows:

fn[T] Value::get_with_string(self : Self, key : String) -> T {
  self.get_ffi(Value::cast_from(key)).cast()
}

extern "js" fn Value::get_ffi(self : Self, key : Self) -> Self = "(obj, key) => obj[key]"

With this require function, we can easily load Node.js's built-in modules, such as the node:path module, and call its methods:

// Load the basename function of the node:path module
let basename : (String) -> String = require("node:path", keys=["basename"]).cast()

test "require Node API" {
  inspect(basename("/foo/bar/baz/asdf/quux.html"), content="quux.html")
}

More excitingly, we can use the same method to call the vast collection of third-party libraries on NPM. Let's take a popular statistical calculation library simple-statistics as an example.

First, we need to initialize package.json and install dependencies, just like in a standard JavaScript project. Here we use pnpm, you can also use npm or yarn:

> pnpm init
> pnpm install simple-statistics

Once the preparation is complete, we can directly require this library in our MoonBit code and get the standardDeviation function from it:

let standard_deviation : (Array[Double]) -> Double = require(
  "simple-statistics",
  keys=["standardDeviation"],
).cast()

Now, whether we use moon run or moon test, MoonBit can correctly load dependencies via Node.js and execute the code, returning the expected result.

test "require external lib" {
  inspect(standard_deviation([2, 4, 4, 4, 5, 5, 7, 9]), content="2")
}

This is quite powerful: with just a few lines of FFI code, we've connected MoonBit's type-safe world with NPM's vast and mature ecosystem.

Conclusion

In this article, we've explored the fundamentals of interacting with JavaScript in MoonBit, from the most basic type interfacing to complex error handling, and finally to the easy integration of external libraries. These features bridge the gap between MoonBit's static type system and JavaScript's dynamic typing, reflecting a modern approach to cross-language interoperability, while allowing developers to enjoy the type safety and modern features of MoonBit while seamlessly accessing the vast JavaScript ecosystem, opening up immense application prospects.

Of course, with great power comes great responsibility. While the FFI is powerful, we must handle type conversions and error boundaries carefully to ensure program robustness.

Mastering these FFI techniques is a crucial skill for developers wanting to extend MoonBit applications with JavaScript libraries. By applying these techniques, we can build high-quality applications that leverage both the strengths of MoonBit and the rich resources of the JavaScript ecosystem.

To learn more about MoonBit's ongoing progress in JavaScript interoperability, please check out the web frontend of mooncakes.io and its underlying UI library, rabbit-tea, both built with MoonBit.

Two Approaches to Regex Engines: Derivative and Thompson VM

· 11 min read

Regular expression engines can be implemented using fundamentally different approaches, each with distinct trade-offs in performance, memory usage, and implementation complexity. This article explores two mathematically equivalent but practically different methods for regex matching: Brzozowski derivatives and Thompson's virtual machine approach.

Both methods operate on the same abstract syntax tree representation, providing a unified foundation for direct performance comparison. The key insight is how these seemingly different approaches solve identical problems through different computational strategies—one through algebraic transformation, the other through program execution.

Conventions & Definitions

To establish a common foundation, both regex engines start with a shared AST representation that captures the essential structure of regular expressions in a tree format:

enum Ast {
  Chr(Char)
  Seq(Ast, Ast)
  Rep(Ast, Int?)
  Opt(Ast)
} derive(Show, Hash, Eq)

Additionally, we provide smart constructors to simplify regex construction:

fn Ast::chr(chr : Char) -> Ast {
  Chr(chr)
}

fn Ast::seq(self : Ast, other : Ast) -> Ast {
  Seq(self, other)
}

fn Ast::rep(self : Ast, n? : Int) -> Ast {
  Rep(self, n)
}

fn Ast::opt(self : Ast) -> Ast {
  @fs.
  Opt(self)
}

The AST defines four fundamental regex operations:

  1. Chr(Char) matches a single literal character.
  2. Seq(Ast, Ast) matches one pattern followed by another through concatenation.
  3. Rep(Ast, Int?) repeats a pattern either unlimited times when None or exactly n times when Some(n).
  4. Opt(Ast) makes a pattern optional, equivalent to pattern? in standard regex syntax.

For example, we can build the regex (ab*)?—an optional sequence of 'a' followed by zero or more 'b's—as:

Ast::chr('a').seq(Ast::chr('b').rep()).opt()

Brzozowski Derivative

The derivative-based approach transforms regular expressions algebraically using formal language theory. For each input character, it computes the "derivative" of the regex by asking: "what remains to be matched after consuming this character?" This creates a new regex representing the remaining pattern.

We extend the basic Ast type to represent derivatives and nullability explicitly:

enum Exp {
  Nil
  Eps
  Chr(Char)
  Alt(Exp, Exp)
  Seq(Exp, Exp)
  Rep(Exp)
} derive(Show, Hash, Eq, Compare)

The constructors in Exp represent:

  1. Nil represents an impossible pattern that can never match anything.
  2. Eps matches the empty string.
  3. Chr(Char) matches a single character.
  4. Alt(Exp, Exp) represents alternation, providing choice between patterns.
  5. Seq(Exp, Exp) represents concatenation of two patterns.
  6. Rep(Exp) represents repetition of a pattern.

We use the Exp::of_ast function to convert the Ast into the more expressive Exp format:

fn Exp::of_ast(ast : Ast) -> Exp {
  match ast {
    Chr(c) => Chr(c)
    Seq(a, b) => Seq(Exp::of_ast(a), Exp::of_ast(b))
    Rep(a, None) => Rep(Exp::of_ast(a))
    Rep(a, Some(n)) => {
      let sec = Exp::of_ast(a)
      let mut exp = sec
      for _ in 1..<n {
        exp = Seq(exp, sec)
      }
      exp
    }
    Opt(a) => Alt(Exp::of_ast(a), Eps)
  }
}

We also provide smart constructors for Exp to simplify pattern building:

fn Exp::seq(a : Exp, b : Exp) -> Exp {
  match (a, b) {
    (Nil, _) | (_, Nil) => Nil
    (Eps, b) => b
    (a, Eps) => a
    (a, b) => Seq(a, b)
  }
}

However, the smart constructor for Alt is strictly necessary—it ensures that the constructed Exp is normalized to "similarity" as mentioned in the original paper by Brzozowski. Two regexes are similar if one can be reduced to the other by applying the following rules:

AAABBAA(BC)(AB)C \begin{align} & A \mid \emptyset &&\rightarrow A \\ & A \mid B &&\rightarrow B \mid A \\ & A \mid (B \mid C) &&\rightarrow (A \mid B) \mid C \end{align}

Therefore, we normalize the Alt construction to always use the same associativity and order of alternatives:

fn Exp::alt(a : Exp, b : Exp) -> Exp {
  match (a, b) {
    (Nil, b) => b
    (a, Nil) => a
    (Alt(a, b), c) => a.alt(b.alt(c))
    (a, b) => {
      if a == b {
        a
      } else if a > b {
        Alt(b, a)
      } else {
        Alt(a, b)
      }
    }
  }
}

The nullable function determines if a pattern can match the empty string without consuming input:

fn Exp::nullable(self : Exp) -> Bool {
  match self {
    Nil => false
    Eps => true
    Chr(_) => false
    Alt(l, r) => l.nullable() || r.nullable()
    Seq(l, r) => l.nullable() && r.nullable()
    Rep(_) => true
  }
}

The deriv function computes the derivative of a pattern with respect to a character, transforming the pattern based on the rules defined in the Brzozowski derivative. We have reordered the rules to match the order in the deriv function:

Da=Daϵ=Daa=ϵDab= for (ab)Da(PQ)=(DaP)(DaQ)Da(PQ)=(DaPQ)(ν(P)DaQ)Da(P)=DaPP \begin{align} D_{a} \emptyset &= \emptyset \\ D_{a} \epsilon &= \emptyset \\ D_{a} a &= \epsilon \\ D_{a} b &= \emptyset & \text{ for }(a \neq b) \\ D_{a} (P \mid Q) &= (D_{a} P) \mid (D_{a} Q) \\ D_{a} (P \cdot Q) &= (D_{a} P \cdot Q) \mid (\nu(P) \cdot D_{a} Q) \\ D_{a} (P\ast) &= D_{a} P \cdot P\ast \\ \end{align}
fn Exp::deriv(self : Exp, c : Char) -> Exp {
  match self {
    Nil => self
    Eps => Nil
    Chr(d) if d == c => Eps
    Chr(_) => Nil
    Alt(l, r) => l.deriv(c).alt(r.deriv(c))
    Seq(l, r) => {
      let dl = l.deriv(c)
      if l.nullable() {
        dl.seq(r).alt(r.deriv(c))
      } else {
        dl.seq(r)
      }
    }
    Rep(e) => e.deriv(c).seq(self)
  }
}

To simplify our implementation, we only perform strict matching—the pattern must match the entire input string. Therefore, we only check for nullability after the entire input has been consumed:

fn Exp::matches(self : Exp, s : String) -> Bool {
  loop (self, s.view()) {
    (Nil, _) => {
      return false
    }
    (e, []) => {
      return e.nullable()
    }
    (e, [c, .. s]) => {
      continue (e.deriv(c), s)
    }
  }
}

Virtual Machine

The VM approach compiles regular expressions into bytecode instructions for a simple virtual machine. This method transforms the pattern-matching problem into program execution, where the VM simulates all possible paths through a non-deterministic finite automaton simultaneously.

Ken Thompson's 1968 paper described a regex engine that compiled patterns into IBM 7094 machine code. The key insight was to avoid exponential backtracking by maintaining multiple execution threads that advance through input in lockstep, processing one character at a time across all possible matching paths.

Instruction Set and Program Representation

The VM operates on four fundamental instructions that correspond to NFA operations:

enum Ops {
  Done
  Char(Char)
  Jump(Int)
  Fork(Int)
} derive(Show)

Each instruction serves a specific purpose in NFA simulation. Done marks successful completion of pattern matching, equivalent to Thompson's original match. Char(c) consumes input character c and advances to the next instruction. Jump(addr) provides unconditional jump to instruction at address addr (Thompson's jmp). Fork(addr) creates two execution paths—one continues to the next instruction, another jumps to addr (Thompson's split).

The Fork instruction is crucial for handling non-determinism in patterns like alternation and repetition, where multiple execution paths must be explored simultaneously. This maps directly to NFA ε-transitions, where execution can spontaneously branch without consuming input.

We define a Prg that wraps an array of instructions with convenience methods for building and manipulating bytecode programs.

struct Prg(Array[Ops]) derive(Show)

fn Prg::push(self : Prg, inst : Ops) -> Unit {
  self.0.push(inst)
}

fn Prg::length(self : Prg) -> Int {
  self.0.length()
}

fn Prg::op_set(self : Prg, index : Int, inst : Ops) -> Unit {
  self.0[index] = inst
}

AST Compilation to Bytecode

The Prg::of_ast function translates AST patterns into VM instructions using standard NFA construction techniques:

  1. Seq(a, b):

    code for a
    code for b
  2. Rep(a, None) (unbounded repetition):

        Fork L1, L2
    L1: code for a
        Jump L1
    L2:
  3. Rep(a, Some(n)) (fixed repetition):

    code for a
    code for a
    ... (n times) ...
  4. Opt(a) (optional):

        Fork L1, L2
    L1: code for a
    L2:

Note that the Fork constructor only accepts one address, because we always want to proceed to the next instruction after the Fork.

fn Prg::of_ast(ast : Ast) -> Prg {
  fn compile(prog : Prg, ast : Ast) -> Unit {
    match ast {
      Chr(chr) => prog.push(Char(chr))
      Seq(l, r) => {
        compile(prog, l)
        compile(prog, r)
      }
      Rep(e, None) => {
        let fork = prog.length()
        prog.push(Fork(0))
        compile(prog, e)
        prog.push(Jump(fork))
        prog[fork] = Fork(prog.length())
      }
      Rep(e, Some(n)) =>
        for _ in 0..<n {
          compile(prog, e)
        }
      Opt(e) => {
        let fork_inst = prog.length()
        prog.push(Fork(0))
        compile(prog, e)
        prog[fork_inst] = Fork(prog.length())
      }
    }
  }

  let prog : Prg = []
  compile(prog, ast)
  prog.push(Done)
  prog
}

VM Execution Loop

In Rob Pike's implementation, the VM executes one-past the end of the input string to handle the final acceptance state. To make this explicit, our matches function implements the core VM execution loop using a two-phase approach:

Phase 1 handles character processing. For each input character, it processes all active threads in the current context. Char instructions that match the current character create new threads in the next context. Jump and Fork instructions immediately spawn new threads in the current context. After processing all threads, it swaps contexts and continues with the next character.

Phase 2 handles final acceptance. After consuming all input, it processes remaining threads looking for Done instructions. It handles any final Jump/Fork instructions that don't consume input. It returns true if any thread reaches a Done instruction.

fn Prg::matches(self : Prg, data : @string.View) -> Bool {
  let Prg(prog) = self
  let mut curr = Ctx::new(prog.length())
  let mut next = Ctx::new(prog.length())
  curr.add(0)
  for c in data {
    while curr.pop() is Some(pc) {
      match prog[pc] {
        Done => ()
        Char(char) if char == c => {
          next.add(pc + 1)
        }
        Jump(jump) =>
          curr.add(jump)
        Fork(fork) => {
          curr.add(fork)
          curr.add(pc + 1)
        }
        _ => ()
      }
    }
    let temp = curr
    curr = next
    next = temp
    next.reset()
  }
  while curr.pop() is Some(pc) {
    match prog[pc] {
      Done => return true
      Jump(x) => curr.add(x)
      Fork(x) => {
        curr.add(x)
        curr.add(pc + 1)
      }
      _ => ()
    }
  }
  false
}

In the original blog post, Rob Pike uses a recursive function to handle Fork and Jump instructions so that threads are executed according to their priorities. Instead, we use a stack-like structure to manage all threads of execution, which naturally respects thread priority:

struct Ctx {
  deque : @deque.Deque[Int]
  visit : FixedArray[Bool]
}

fn Ctx::new(length : Int) -> Ctx {
  { deque: @deque.new(), visit: FixedArray::make(length, false) }
}

fn Ctx::add(self : Ctx, pc : Int) -> Unit {
  if !self.visit[pc] {
    self.deque.push_back(pc)
    self.visit[pc] = true
  }
}

fn Ctx::pop(self : Ctx) -> Int? {
  match self.deque.pop_back() {
    Some(pc) => {
      self.visit[pc] = false
      Some(pc)
    }
    None => None
  }
}

fn Ctx::reset(self : Ctx) -> Unit {
  self.deque.clear()
  self.visit.fill(false)
}

The visit array is used to drop low-priority threads. When a new thread is added, we first check if it is already in the deque using the visit array. If it is, we drop it; otherwise, we add it to the deque and mark it as visited. This mechanism is necessary to avoid infinite loops or exponential blowup when the regex contains patterns that can be expanded indefinitely, such as (a?)*.

Benchmarks and Performance Analysis

The benchmark demonstrates both approaches on a pathological case that challenges many regex implementations:

test (b : @bench.T) {
  let n = 15
  let txt = "a".repeat(n)
  let chr = Ast::chr('a')
  let ast : Ast = chr.opt().rep(n~).seq(chr.rep(n~))
  let exp = Exp::of_ast(ast)
  b.bench(name="derive", () => exp.matches(txt) |> ignore())
  let tvm = Prg::of_ast(ast)
  b.bench(name="thompson", () => tvm.matches(txt) |> ignore())
}

This pattern (a?){n}a{n} represents a classical exponential blowup case for backtracking engines. The pattern allows n different ways to match n 'a' characters, creating exponential search spaces in naive implementations.

name     time (mean ± σ)         range (min … max)
derive     41.78 µs ±   0.14 µs    41.61 µs …  42.13 µs  in 10 ×   2359 runs
thompson   12.79 µs ±   0.04 µs    12.74 µs …  12.84 µs  in 10 ×   7815 runs

The benchmark results show that the VM approach is significantly faster than the derivative-based approach for this case. The derivative method frequently allocates intermediate regex structures, leading to higher overhead and slower performance. In contrast, the VM executes a fixed set of instructions and rarely allocates new structures once the deque grows to its full size.

However, the derivative approach is easier to reason about. We can easily prove termination of the algorithm, as the number of derivatives to be computed is bounded by the size of the AST and strictly decreases with each recursive application of the deriv function. The VM approach, on the other hand, can potentially run indefinitely if the input Prg contains infinite loops, and requires careful handling of thread priority to avoid infinite loops and exponential blowup in the number of threads.

Prettyprinter: Declarative Structured Data Formatting with Function Composition

· 8 min read

When working with structured data, printing it in a clear and adaptable format is a common challenge. This comes up often in debugging, logging, and code generation. For instance, an array literal [a,b,c] should ideally print on one line if the screen is wide enough, but gracefully wrap and indent when space is limited.

Traditional solutions often rely on manually concatenating strings while tracking indentation levels. This approach is not only tedious, but also error-prone.

A more elegant solution is to use function composition. With this approach, we build a prettyprinter: a system where users combine primitive formatting functions into a Doc structure that describes the intended layout. Given a maximum width, the prettyprinter automatically chooses the most readable formatting.

This makes the printing process declarative—you specify what the layout should look like under different conditions, and the system figures out how to render it.

SimpleDoc Primitives

We begin with a minimal representation called SimpleDoc. It consists of just four primitives:

enum SimpleDoc {
  Empty
  Line
  Text(String)
  Cat(SimpleDoc, SimpleDoc)
}
  • Empty: represents an empty string
  • Line: represents a newline
  • Text(String): plain text without line breaks
  • Cat(SimpleDoc, SimpleDoc): concatenates two SimpleDocss

Using these primitives, we can implement a simple rendering function. It flattens a SimpleDoc into a string using a stack-based traversal:

fn SimpleDoc::render(doc : SimpleDoc) -> String {
  let buf = StringBuilder::new()
  let stack = [doc]
  while stack.pop() is Some(doc) {
    match doc {
      Empty => ()
      Line => {
        buf..write_string("\n")
      }
      Text(text) => {
        buf.write_string(text)
      }
      Cat(left, right) =>
        stack..push(right)..push(left)
    }
  }
  buf.to_string()
}

Here’s a quick test: we can see that the expressiveness of SimpleDoc is equivalent to String: Empty corresponds to "", Line corresponds to "\n", Text("a") corresponds to "a", and Cat(Text("a"), Text("b")) corresponds to "a" + "b".

test "simple doc" {
  let doc : SimpleDoc = Cat(Text("hello"), Cat(Line, Text("world")))
  inspect(
    doc.render(),
    content=(
      #|hello
      #|world
    ),
  )
}

At this stage, the SimpleDoc doesn’t yet handle indentation or layout choices—but we’re about to fix that.

ExtendDoc: Nest, Choice, Group

To handle real-world formatting, we extend SimpleDoc with three new primitives:

enum ExtendDoc {
  Empty
  Line
  Text(String)
  Cat(ExtendDoc, ExtendDoc)
  Nest(Int, ExtendDoc)
  Choice(ExtendDoc, ExtendDoc)
  Group(ExtendDoc)
}
  • Nest Nest(Int, ExtendDoc) indents the doc by n spaces after each line break. Nested levels accumulate.

  • Choice Choice(ExtendDoc, ExtendDoc) stores two alternative layouts. Usually, the first parameter is the more compact layout without line breaks, and the second is the layout with Lines. The renderer uses the first layout in compact mode and the second otherwise.

  • Group Group(ExtendDoc) groups an ExtendDoc and decides between compact or non-compact layout based on the available width. If the remaining space is sufficient, it prints compactly; otherwise, it falls back to the layout with line breaks.

Measuring Space

To know whether compact layout fits, we need a way to estimate how many characters a document would require:

let max_space = 9999

fn ExtendDoc::space(self : Self) -> Int {
  match self {
    Empty => 0
    Line => max_space
    Text(str) => str.length()
    Cat(a, b) => a.space() + b.space()
    Nest(_, a) | Choice(a, _) | Group(a) => a.space()
  }
}

Here, Line is treated as requiring “infinite” space. This guarantees that if a Group contains a line break, it won’t attempt to print compactly.

Rendering ExtendDoc

We extend SimpleDoc::render to implement ExtendDoc::render. Since after printing a substructure we need to return to the original indentation level, the stack must also store two states for each pending ExtendDoc: indentation and whether compact mode is active. We also maintain a column variable to track the number of characters already used on the current line, in order to calculate remaining space. Finally, the function adds a width parameter to specify the maximum line width.

fn ExtendDoc::render(doc : ExtendDoc, width~ : Int = 80) -> String {
  let buf = StringBuilder::new()
  let stack = [(0, false, doc)] // default: no indentation, non-compact mode
  let mut column = 0
  while stack.pop() is Some((indent, fit, doc)) {
    match doc {
      Empty => ()
      Line => {
        buf..write_string("\n")
        for _ in 0..<indent {
          buf.write_string(" ")
        }
        column = indent
      }
      Text(text) => {
        buf.write_string(text)
        column += text.length()
      }
      Cat(left, right) =>
        stack..push((indent, fit, right))..push((indent, fit, left))
      Nest(n, doc) => stack..push((indent + n, fit, doc))
      Choice(a, b) =>
        stack.push(if fit { (indent, fit, a) } else { (indent, fit, b) })
      Group(doc) => {
        let fit = fit || column + doc.space() <= width
        stack.push((indent, fit, doc))
      }
    }
  }
  buf.to_string()
}

Let’s use ExtendDoc to describe a (expr) and print it under different width:

let softline : ExtendDoc = Choice(Empty, Line)

impl Add for ExtendDoc with op_add(a, b) {
  Cat(a, b)
}

test "tuple" {
  let tuple : ExtendDoc = Group(
    Text("(") + Nest(2, softline + Text("expr")) + softline + Text(")"),
  )
  inspect(tuple.render(width=40), content="(expr)")
  inspect(
    tuple.render(width=5),
    content=(
      #|(
      #|  expr
      #|)
    ),
  )
}

Here, softline is defined as a choice between Empty and Line. Since rendering starts in non-compact mode, we wrap the whole expression with Group. When the width is sufficient, the entire expression prints on one line; otherwise, it automatically wraps with indentation. To improve readability, we overloaded the + operator for ExtendDoc.

Composition Functions

In practice, users rely more on higher-level combinators built from the ExtendDoc primitives—like the softline above. Let’s introduce some useful functions for structured printing.

softline & softbreak

let softbreak : ExtendDoc = Choice(Text(" "), Line)

Similar to softline, except that in compact mode it inserts a space. Note that within the same Group, all Choices follow the same compact or non-compact decision.

let abc : ExtendDoc = Text("abc")
let def : ExtendDoc = Text("def")
let ghi : ExtendDoc = Text("ghi")

test "softbreak" {
  let doc : ExtendDoc = Group(abc + softbreak + def + softbreak + ghi)
  inspect(doc.render(width=20), content="abc def ghi")
  inspect(
    doc.render(width=10),
    content=(
      #|abc
      #|def
      #|ghi
    ),
  )
}

autoline & autobreak

let autoline : ExtendDoc = Group(softline)
let autobreak : ExtendDoc = Group(softbreak)

autoline and autobreak make sure the ExtendDocs fit as much as possible on one line, like text editors do.

test {
  let doc : ExtendDoc = Group(
    abc + autobreak + def + autobreak + ghi,
  )
  inspect(doc.render(width=10), content="abc def ghi")
  inspect(
    doc.render(width=5),
    content=(
      #|abc def
      #|ghi
    ),
  )
  inspect(
    doc.render(width=3),
    content=(
      #|abc
      #|def
      #|ghi
    ),
  )
}

sepby

fn sepby(xs : Array[ExtendDoc], sep : ExtendDoc) -> ExtendDoc {
  match xs {
    [] => Empty
    [x, .. xs] => xs.fold(init=x, (a, b) => a + sep + b)
  }
}

sepby inserts a separator sep between ExtendDocs.

let comma : ExtendDoc = Text(",")
test {
  let layout = Group(sepby([abc, def, ghi], comma + softbreak))
  inspect(layout.render(width=40), content="abc, def, ghi")
  inspect(
    layout.render(width=10),
    content=(
      #|abc,
      #|def,
      #|ghi
    ),
  )
}

surround

fn surround(m : ExtendDoc, l : ExtendDoc, r : ExtendDoc) -> ExtendDoc {
  l + m + r
}

surround wraps an ExtendDoc with left and right delimiters.

test {
  inspect(surround(abc, Text("("), Text(")")).render(), content="(abc)")
}

Printing JSON

Using the functions above, we can implement a JSON prettyprinter. This function recursively processes each JSON element and generates the appropriate layout.

fn pretty(x : Json) -> ExtendDoc {
  fn comma_list(xs, l, r) {
    (Nest(2, softline + sepby(xs, comma + softbreak)) + softline)
    |> surround(l, r)
    |> Group
  }

  match x {
    Array(elems) => {
      let elems = elems.iter().map(pretty).collect()
      comma_list(elems, Text("["), Text("]"))
    }
    Object(pairs) => {
      let pairs = pairs
        .iter()
        .map(p => Group(Text(p.0.escape()) + Text(": ") + pretty(p.1)))
        .collect()
      comma_list(pairs, Text("{"), Text("}"))
    }
    String(s) => Text(s.escape())
    Number(i) => Text(i.to_string())
    False => Text("false")
    True => Text("true")
    Null => Text("null")
  }
}

When rendered, the JSON automatically adapts to different widths:

test {
  let json : Json = {
    "key1": "string",
    "key2": [12345, 67890],
    "key3": [
      { "field1": 1, "field2": 2 },
      { "field1": 1, "field2": 2 },
      { "field1": [1, 2], "field2": 2 },
    ],
  }
  inspect(
    pretty(json).render(width=80),
    content=(
      #|{
      #|  "key1": "string",
      #|  "key2": [12345, 67890],
      #|  "key3": [
      #|    {"field1": 1, "field2": 2},
      #|    {"field1": 1, "field2": 2},
      #|    {"field1": [1, 2], "field2": 2}
      #|  ]
      #|}
    ),
  )
  inspect(
    pretty(json).render(width=30),
    content=(
      #|{
      #|  "key1": "string",
      #|  "key2": [12345, 67890],
      #|  "key3": [
      #|    {"field1": 1, "field2": 2},
      #|    {"field1": 1, "field2": 2},
      #|    {
      #|      "field1": [1, 2],
      #|      "field2": 2
      #|    }
      #|  ]
      #|}
    ),
  )
  inspect(
    pretty(json).render(width=20),
    content=(
      #|{
      #|  "key1": "string",
      #|  "key2": [
      #|    12345,
      #|    67890
      #|  ],
      #|  "key3": [
      #|    {
      #|      "field1": 1,
      #|      "field2": 2
      #|    },
      #|    {
      #|      "field1": 1,
      #|      "field2": 2
      #|    },
      #|    {
      #|      "field1": [
      #|        1,
      #|        2
      #|      ],
      #|      "field2": 2
      #|    }
      #|  ]
      #|}
    ),
  )
}

Conclusion

By combining a small set of primitives with function composition, we can build a flexible, declarative prettyprinter that adapts structured data layouts to the available screen width.

This approach scales well: you describe layout intentions with combinators like sepby, surround, or autobreak, and the rendering engine takes care of indentation, line breaks, and fitting.

The current implementation can be further optimized:

  • Memoizing space calculations to improve performance.
  • Adding a ribbon parameter to balance whitespace vs. content density
  • Supporting advanced layouts like hanging indents or mandatory line breaks

For a deeper dive, see Philip Wadler’s classic paper A prettier printer – Philip Wadler, as well as prettyprinter libraries in Haskell, OCaml, and other languages.

Mini-adapton: incremental computation in MoonBit

· 10 min read

Introduction

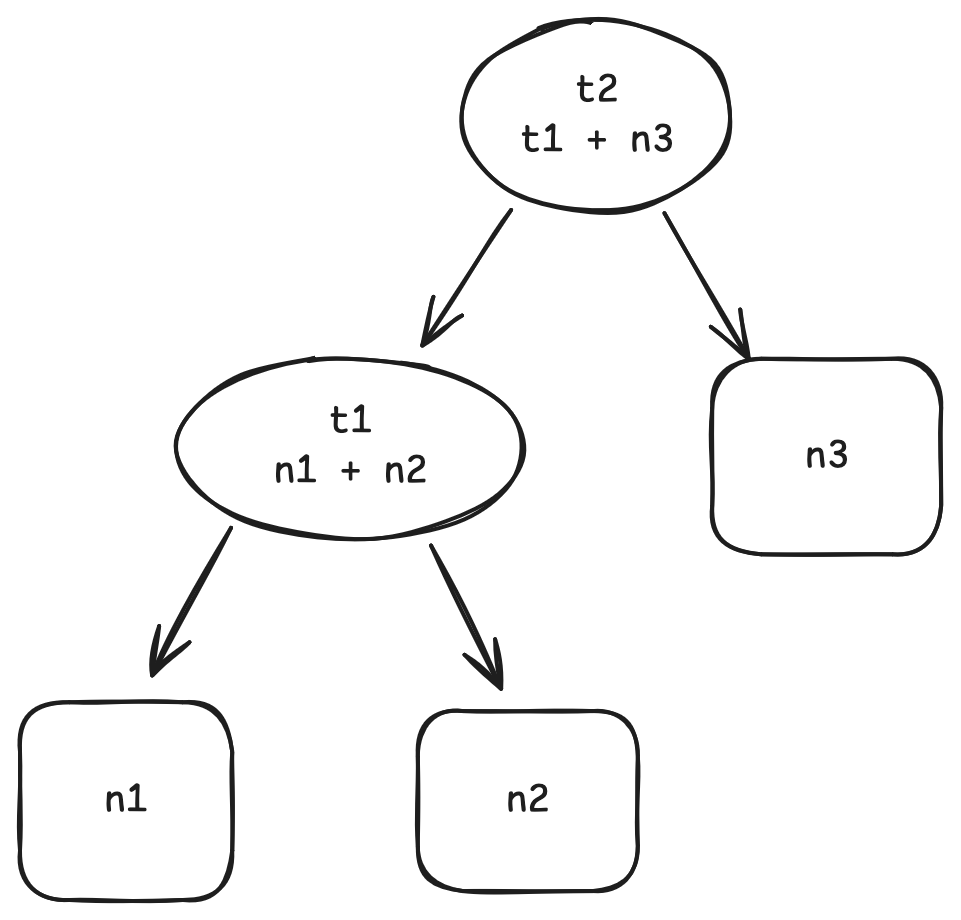
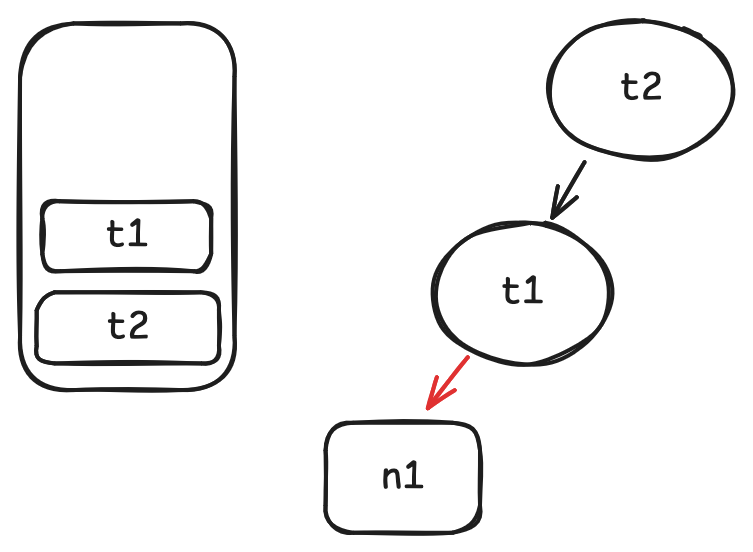
Let's first illustrate how incremental computation looks like with an example similar to spreadsheet. First define a dependency graph like this:

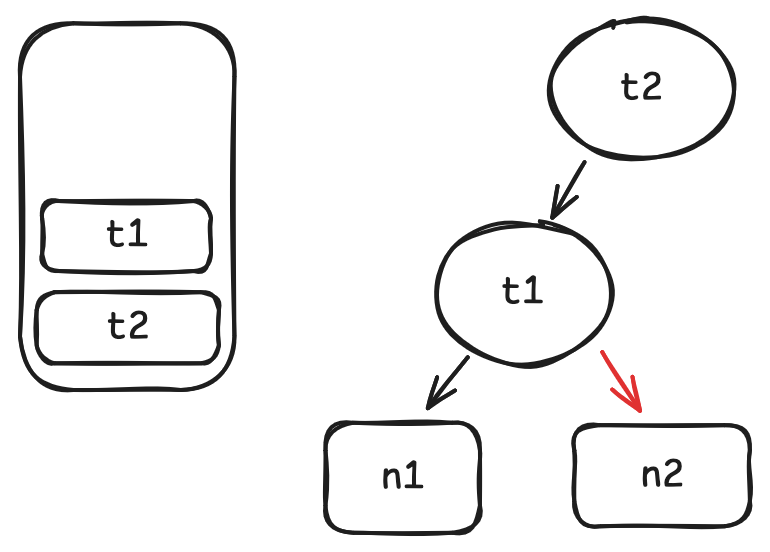
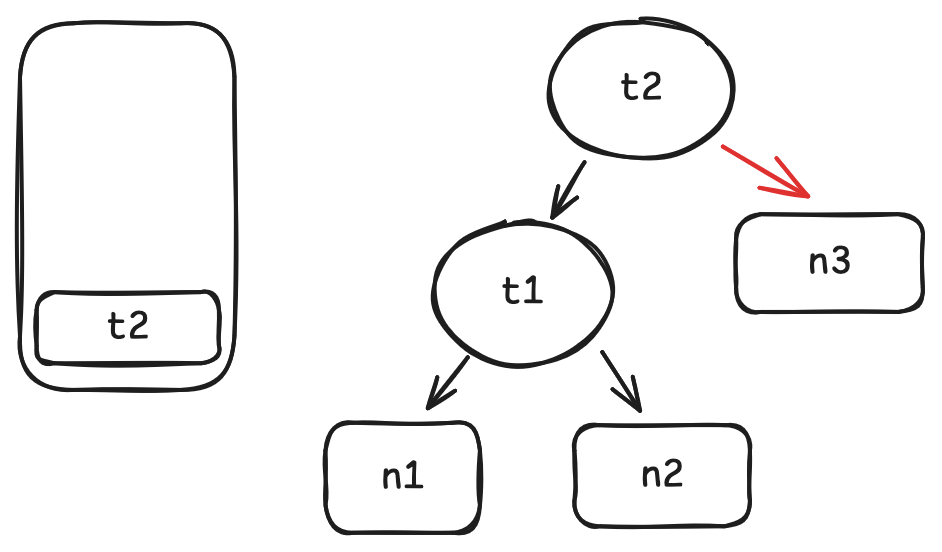
In this graph, t1's value is computed from n1 + n2 and t2's value is computed from t1 + n3.

When we want to get the value of t2, the computation defined in the graph will be done: first t1 is computed by n1 + n2, then t2 is computed by t1 + n3. This process is the same as non-incremental computation.

However, when we start to change values in n1, n2, or n3, things get different. Say we swap the value of n1 and n2, then get t2's value. In non-incremental computation, both t1 and t2 will be recomputed. But the computation of t2 is actually not needed, since all its dependency t1 and n3 are not changed (swap n1 and n2 wont change t1's value).

The following code example does exactly what we describe above. We use Cell::new to define n1, n2, and n3, which does not need computation. And Thunk::new to define t1 and t2 with computation.

test {
  // a counter to record the times of t2's computation
  let mut cnt = 0
  // start define the graph
  let n1 = Cell::new(1)
  let n2 = Cell::new(2)
  let n3 = Cell::new(3)
  let t1 = Thunk::new(fn() {
    n1.get() + n2.get()
  })
  let t2 = Thunk::new(fn() {
    cnt += 1
    t1.get() + n3.get()
  })
  // get the value of t2
  inspect(t2.get(), content="6")
  inspect(cnt, content="1")
  // swap value of n1 and n2
  n1.set(2)
  n2.set(1)
  inspect(t2.get(), content="6")
  // t2 does not recompute
  inspect(cnt, content="1")
}

In this article, we will show how to implement an incremental computation library in MoonBit with the api used in the above example:

Cell::new
Cell::get
Cell::set
Thunk::new
Thunk::get

Problem Analysis and Solution

To implement the library, there are three main problems to solve:

Build up dependency graph on the fly

As a library in MoonBit, we don't have any easy ways to build up the dependency graph statically, since MoonBit does not have any meta programming mechanism currently. Therefore, we need to construct dependency graph on the fly. Since all we care about is what cells/thunks does a thunk depend on, a good option to build up dependency graph would be when user calls Thunk::get. Take the code above as an example:

let n1 = Cell::new(1)
let n2 = Cell::new(2)
let n3 = Cell::new(3)
let t1 = Thunk::new(fn() { n1.get() + n2.get() })
let t2 = Thunk::new(fn() { t1.get() + n3.get() })
t2.get()

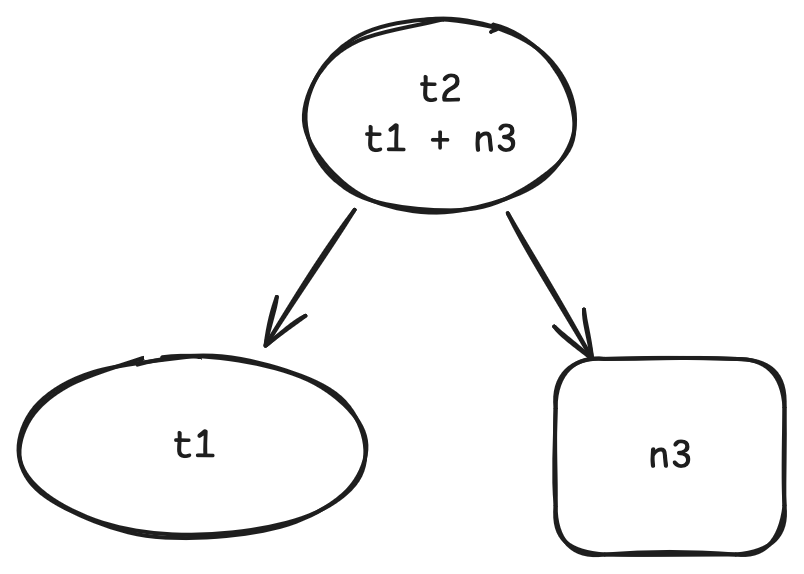
When user calls t2.get(), we can know that at runtime t1.get() and n3.get() are called inside it. Therefore, t1 and n3 are dependencies of t2 and we can construct a subgraph:

The same story will also happen when t1.get() is called inside t2.get().

So here is the plan:

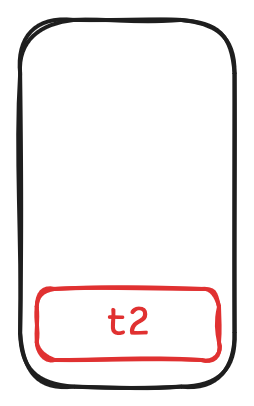
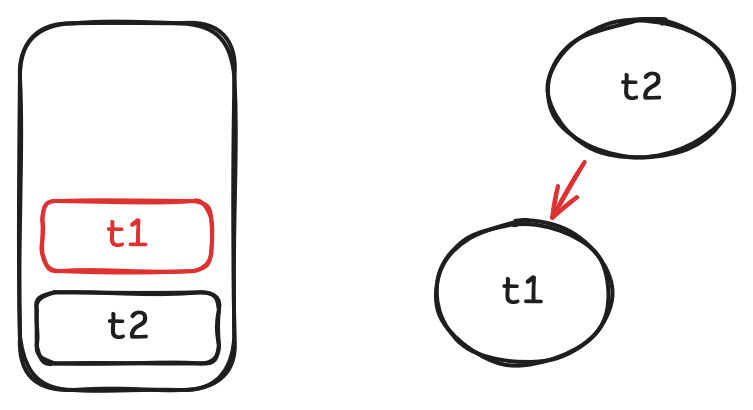
  1. we declare a stack to record which thunk are we currently getting. The reason we use stack here is that we are essentially record call stacks of every get.
  2. whenever we call get, mark it as the dependency of stack top. If it's a thunk, push it onto stack.
  3. whenever a thunk's get finished, pop it off the stack.

Let's see the full process of above example under this algorithm:

  1. when we call t2.get, push t2 on the stack.

  2. when we call t1.get inside t2.get, mark t1 as a dependency of t2 and push t1 onto the stack.

  3. when we call n1.get inside t1.get, mark n1 as a dependency of t1.

  4. same story goes for n2.

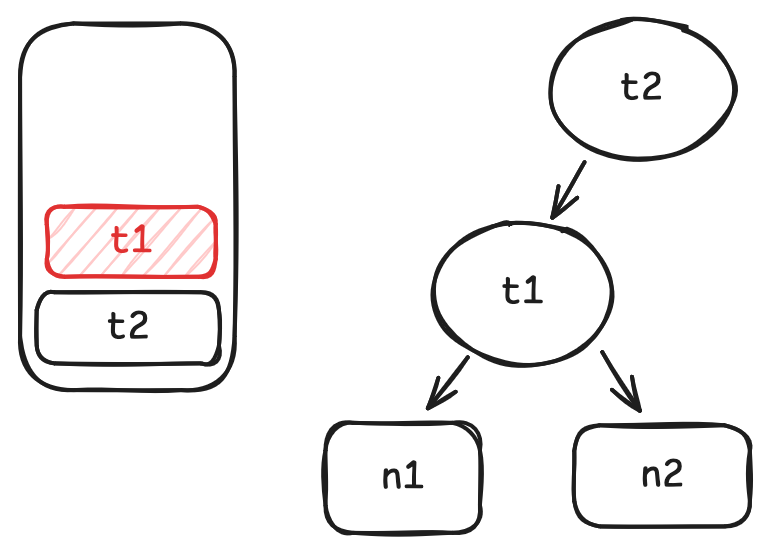
  5. when t1.get finished, pop it from stack.

  6. when we call n3.get, mark n3 as a dependency of t2

Besides the edge from dependent to dependency, we'd better also record an edge from dependency to dependent, so that we can easily traverse the graph backwards when we need.

In the code below, we'll use outgoing_edges to refer to edge from parent(dependent) to child (dependency) and incoming_edges to refer to the opposite.

A mechanism to mark outdated node

Whenever we call Cell::set, the node itself and all nodes depend on it should be marked as outdated. This will be one of the criteria to determine whether a thunk needs to be recomputed. This is generally a recursive backward traverse from a leaf of a graph. We can describe the process as pseudo MoonBit code:

fn dirty(node: Node) -> Unit {
  for n in node.incoming_edges {
    n.set_dirty(true)
    dirty(node)
  }
}

Determine whether a thunk needs to be recomputed

Whenever we call Thunk::get, we need to determine whether it really needs to be recomputed. But the dirty mechanism we describe in the last subsection is not enough. If we only use dirtiness to determine whether a thunk needs to be recomputed, there would be unneeded computation. Let's see it from the example we give at the beginning:

n1.set(2)
n2.set(1)
inspect(t2.get(), content="6")

After we swap the value of n1 and n2, n1, n2, t1, and t2 should all be marked as dirty, but when we call t2.get, there is no need to recompute t2, since the value of t1 does not change.

This reminds us that despite dirtiness, we need also to record whether a node's value differs from its last value. If a node is both dirty and one of its dependencies' value changed, it needs to be recomputed.

We can describe the algorithm as the pseudo MoonBit code below:

fn propagate(self: Node) -> Unit {
  // When a node is dirty, it might need to be recomputed
  if self.is_dirty() {
    // after recomputing, it's no longer dirty
    self.set_dirty(false)
    for dependency in self.outgoing_edges() {
      // recursively recompute every dependency
      dependency.propagate()
      // If a dependency's value changed, the node needs to be recomputed
      if dependency.is_changed() {
        // remove all incoming_edges and outgoing_edges, since they will be reconstructed during evaluate
        self.incoming_edges().clear()
        self.outgoing_edges().clear()
        self.evaluate()
        return
      }
    }
  }
}

Implementation

Given the algorithms described in the last section, the implementation should be quite straightforward.

First, let's define Cell:

struct Cell[A] {
  mut is_dirty : Bool
  mut value : A
  mut is_changed : Bool
  incoming_edges : Array[&Node]
}

Since Cell can only be leaf node in dependency graph, it does not have outgoing_edges. The trait Node here is used to abstract node in dependency graph.

Then, let's define Thunk:

struct Thunk[A] {
  mut is_dirty : Bool
  mut value : A?
  mut is_changed : Bool
  thunk : () -> A
  incoming_edges : Array[&Node]
  outgoing_edges : Array[&Node]
}

Thunk's value is optional, since it only exists after we first call Thunk::get.

We can easily add new for both types:

fn[A : Eq] Cell::new(value : A) -> Cell[A] {
  Cell::{
    is_changed: false,
    value,
    incoming_edges: [],
    is_dirty: false,
  }
}
fn[A : Eq] Thunk::new(thunk : () -> A) -> Thunk[A] {
  Thunk::{
    value: None,
    is_changed: false,
    thunk,
    incoming_edges: [],
    outgoing_edges: [],
    is_dirty: false,
  }
}

Thunk and Cell are the two kinds of node in dependency graph, we can use the trait Node mentioned above to abstract them:

trait Node {
  is_dirty(Self) -> Bool
  set_dirty(Self, Bool) -> Unit
  incoming_edges(Self) -> Array[&Node]
  outgoing_edges(Self) -> Array[&Node]
  is_changed(Self) -> Bool
  evaluate(Self) -> Unit
}

And implement the trait for both types:

impl[A] Node for Cell[A] with incoming_edges(self) {
  self.incoming_edges
}

impl[A] Node for Cell[A] with outgoing_edges(_self) {
  []
}

impl[A] Node for Cell[A] with is_dirty(self) {
  self.is_dirty
}

impl[A] Node for Cell[A] with set_dirty(self, new_dirty) {
  self.is_dirty = new_dirty
}

impl[A] Node for Cell[A] with is_changed(self) {
  self.is_changed
}

impl[A] Node for Cell[A] with evaluate(_self) {
  ()
}

impl[A : Eq] Node for Thunk[A] with is_changed(self) {
  self.is_changed
}

impl[A : Eq] Node for Thunk[A] with outgoing_edges(self) {
  self.outgoing_edges
}

impl[A : Eq] Node for Thunk[A] with incoming_edges(self) {
  self.incoming_edges
}

impl[A : Eq] Node for Thunk[A] with is_dirty(self) {
  self.is_dirty
}

impl[A : Eq] Node for Thunk[A] with set_dirty(self, new_dirty) {
  self.is_dirty = new_dirty
}

impl[A : Eq] Node for Thunk[A] with evaluate(self) {
  // push self into node_stack top
  // now self is active target
  node_stack.push(self)
  // `self.thunk` might contains `source.get()`,
  // such as `s1.get()`, `s2.get()` and `s3.get()`
  //
  // when call `Thunk::get` or `Cell::get`,
  // they will treat `node_stack.last()` as themself's target.
  // if source is `Cell`, then it only record `incoming_edges`.
  // if source is `Thunk`, then it record `incoming_edges` and `outgoing_edges`, connect each other.
  //
  let value = (self.thunk)()
  self.is_changed = match self.value {
    None => true
    Some(v) => v != value
  }
  self.value = Some(value)
  // pop self from node_stack
  // now self is no longer active target
  node_stack.unsafe_pop() |> ignore
}

The only complicated implementation is Thunk's evaluate. Here we need first to push the thunk on stack for dependency recording. node_stack is defined as below:

let node_stack : Array[&Node] = []

Then do the real computation and compare it with the last value to update self.is_changed. is_changed is used later to determine whether we need to recompute a thunk.

dirty and propagate are almost the same as the pseudo code described above:

fn &Node::dirty(self : &Node) -> Unit {
  for dependent in self.incoming_edges() {
    if not(dependent.is_dirty()) {
      dependent.set_dirty(true)
      dependent.dirty()
    }
  }
}
fn &Node::propagate(self : &Node) -> Unit {
  if self.is_dirty() {
    self.set_dirty(false)
    for dependency in self.outgoing_edges() {
      dependency.propagate()
      if dependency.is_changed() {
        self.incoming_edges().clear()
        self.outgoing_edges().clear()
        self.evaluate()
        return
      }
    }
  }
}

With all the foundation we build, the three main api: Cell::get, Cell:set, and Thunk::get are easy to implement.

To get value from a cell, it's simply just return the value filed in struct. But before that, we need first record it as a dependency if it's called inside Thunk::get.

fn[A] Cell::get(self : Cell[A]) -> A {
  if node_stack.last() is Some(target) {
    target.outgoing_edges().push(self)
    self.incoming_edges.push(target)
  }
  self.value
}

Whenever we set a cell, we need to first make sure that the two states is_changed and dirty are updated correctly. Then mark every dependent as dirty.

fn[A : Eq] Cell::set(self : Cell[A], new_value : A) -> Unit {
  if self.value != new_value {
    self.is_changed = true
    self.value = new_value
    self.set_dirty(true)
    &Node::dirty(self)
  }
}

In Thunk::get, similar to Cell::get, we first need to record self as a dependency. After that we pattern match on self.value. If it's None, it means that this is the first time user tries to get the thunk's value, so we can safely just evaluate it. If it's Some, we use propagate to make sure that we only recompute thunks that's really needed.

fn[A : Eq] Thunk::get(self : Thunk[A]) -> A {
  if node_stack.last() is Some(target) {
    target.outgoing_edges().push(self)
    self.incoming_edges.push(target)
  }
  match self.value {
    None => self.evaluate()
    Some(_) => &Node::propagate(self)
  }
  self.value.unwrap()
}

Reference

A Guide to MoonBit Python Integration

· 12 min read

Introduction

Python, with its concise syntax and vast ecosystem, has become one of the most popular programming languages today. However, discussions around its performance bottlenecks and the maintainability of its dynamic typing system in large-scale projects have never ceased. To address these challenges, the developer community has explored various optimization paths.

The python.mbt tool, officially launched by MoonBit, offers a new perspective. It allows developers to call Python code directly within the MoonBit environment. This combination aims to merge MoonBit's static type safety and high-performance potential with Python's mature ecosystem. Through python.mbt, developers can leverage MoonBit's static analysis capabilities, modern build and testing tools, while enjoying Python's rich library functions, making it possible to build large-scale, high-performance system-level software.

This article aims to delve into the working principles of python.mbt and provide a practical guide. It will answer common questions such as: How does python.mbt work? Is it slower than native Python due to an added intermediate layer? What are its advantages over existing tools like C++'s pybind11 or Rust's PyO3? To answer these questions, we first need to understand the basic workflow of the Python interpreter.

How the Python Interpreter Works

The Python interpreter executes code in three main stages:

  1. Parsing: This stage includes lexical analysis and syntax analysis. The interpreter breaks down human-readable Python source code into tokens and then organizes these tokens into a tree-like structure, the Abstract Syntax Tree (AST), based on syntax rules.

    For example, for the following Python code:

    def add(x, y):
      return x + y
    
    a = add(1, 2)
    print(a)

    We can use Python's ast module to view its generated AST structure:

    Module(
        body=[
            FunctionDef(
                name='add',
                args=arguments(
                    args=[
                        arg(arg='x'),
                        arg(arg='y')]),
                body=[
                    Return(
                        value=BinOp(
                            left=Name(id='x', ctx=Load()),
                            op=Add(),
                            right=Name(id='y', ctx=Load())))]),
            Assign(
                targets=[
                    Name(id='a', ctx=Store())],
                value=Call(
                    func=Name(id='add', ctx=Load()),
                    args=[
                        Constant(value=1),
                        Constant(value=2)])),
            Expr(
                value=Call(
                    func=Name(id='print', ctx=Load()),
                    args=[
                        Name(id='a', ctx=Load())]))])
  2. Compilation: Next, the Python interpreter compiles the AST into a lower-level, more linear intermediate representation called bytecode. This is a platform-independent instruction set designed for the Python Virtual Machine (PVM).

    Using Python's dis module, we can view the bytecode corresponding to the above code:

      2           LOAD_CONST               0 (<code object add>)
                  MAKE_FUNCTION
                  STORE_NAME               0 (add)
    
      5           LOAD_NAME                0 (add)
                  PUSH_NULL
                  LOAD_CONST               1 (1)
                  LOAD_CONST               2 (2)
                  CALL                     2
                  STORE_NAME               1 (a)
    
      6           LOAD_NAME                2 (print)
                  PUSH_NULL
                  LOAD_NAME                1 (a)
                  CALL                     1
                  POP_TOP
                  RETURN_CONST             3 (None)
  3. Execution: Finally, the Python Virtual Machine (PVM) executes the bytecode instructions one by one. Each instruction corresponds to a C function call in the CPython interpreter's underlying layer. For example, LOAD_NAME looks up a variable, and BINARY_OP performs a binary operation. It is this process of interpreting and executing instructions one by one that is the main source of Python's performance overhead. A simple 1 + 2 operation involves the entire complex process of parsing, compilation, and virtual machine execution.

Understanding this process helps us grasp the basic approaches to Python performance optimization and the design philosophy of python.mbt.

Paths to Optimizing Python Performance

Currently, there are two mainstream methods for improving Python program performance:

  1. Just-In-Time (JIT) Compilation: Projects like PyPy analyze a running program and compile frequently executed "hotspot" bytecode into highly optimized native machine code, thereby bypassing the PVM's interpretation and significantly speeding up computationally intensive tasks. However, JIT is not a silver bullet; it cannot solve the inherent problems of Python's dynamic typing, such as the difficulty of effective static analysis in large projects, which poses challenges for software maintenance.
  2. Native Extensions: Developers can use languages like C++ (with pybind11) or Rust (with PyO3) to directly call Python functions or to write performance-critical modules that are then called from Python. This method can achieve near-native performance, but it requires developers to be proficient in both Python and a complex system-level language, presenting a steep learning curve and a high barrier to entry for most Python programmers.

python.mbt is also a native extension. But compared to languages like C++ and Rust, it attempts to find a new balance between performance, ease of use, and engineering capabilities, with a greater emphasis on using Python features directly within the MoonBit language.

  1. High-Performance Core: MoonBit is a statically typed, compiled language whose code can be efficiently compiled into native machine code. Developers can implement computationally intensive logic in MoonBit to achieve high performance from the ground up.
  2. Seamless Python Calls: python.mbt interacts directly with CPython's C-API to call Python modules and functions. This means call overhead is minimized, bypassing Python's parsing and compilation stages and going straight to the virtual machine execution layer.
  3. Gentler Learning Curve: Compared to C++ and Rust, MoonBit's syntax is more modern and concise. It also has comprehensive support for functional programming, a documentation system, unit testing, and static analysis tools, making it more friendly to developers accustomed to Python.
  4. Improved Engineering and AI Collaboration: MoonBit's strong type system and clear interface definitions make code intent more explicit and easier for static analysis tools and AI-assisted programming tools to understand. This helps maintain code quality in large projects and improves the efficiency and accuracy of collaborative coding with AI.

Using Pre-wrapped Python Libraries in MoonBit

To facilitate developer use, MoonBit will officially wrap mainstream Python libraries once the build system and IDE are mature. After wrapping, users can use these Python libraries in their projects just like importing regular MoonBit packages. Let's take the matplotlib plotting library as an example.

First, add the matplotlib dependency in your project's root moon.pkg.json or via the terminal:

moon update
moon add Kaida-Amethyst/matplotlib

Then, declare the import in the moon.pkg.json of the sub-package where you want to use the library. Here, we follow Python's convention and set an alias plt:

{
  "import": [
    {
      "path": "Kaida-Amethyst/matplotlib",
      "alias": "plt"
    }
  ]
}

After configuration, you can call matplotlib in your MoonBit code to create plots:

let sin : (Double) -> Double = @math.sin

fn main {
  let x = Array::makei(100, fn(i) { i.to_double() * 0.1 })
  let y = x.map(sin)

  // To ensure type safety, the wrapped subplots interface always returns a tuple of a fixed type.
  // This avoids the dynamic behavior in Python where the return type depends on the arguments.
  let (_, axes) = plt::subplots(1, 1)

  // Use the .. cascade call syntax
  axes[0][0]
  ..plot(x, y, color = Green, linestyle = Dashed, linewidth = 2)
  ..set_title("Sine of x")
  ..set_xlabel("x")
  ..set_ylabel("sin(x)")

  @plt.show()
}

Currently, on macOS and Linux, MoonBit's build system can automatically handle dependencies. On Windows, users may need to manually install a C compiler and configure the Python environment. Future MoonBit IDEs will aim to simplify this process.

Using Unwrapped Python Modules in MoonBit

The Python ecosystem is vast, and even with AI technology, relying solely on official wrappers is not realistic. Fortunately, we can use the core features of python.mbt to interact directly with any Python module. Below, we demonstrate this process using the simple time module from the Python standard library.

Introducing python.mbt

First, ensure your MoonBit toolchain is up to date, then add the python.mbt dependency:

moon update
moon add Kaida-Amethyst/python

Next, import it in your package's moon.pkg.json:

{
  "import": ["Kaida-Amethyst/python"]
}

python.mbt automatically handles the initialization (Py_Initialize) and shutdown of the Python interpreter, so developers don't need to manage it manually.

Importing Python Modules

Use the @python.pyimport function to import modules. To avoid performance loss from repeated imports, it is recommended to use a closure technique to cache the imported module object:

// Define a struct to hold the Python module object for enhanced type safety
pub struct TimeModule {
  time_mod: PyModule
}

// Define a function that returns a closure for getting a TimeModule instance
fn import_time_mod() -> () -> TimeModule {
  // The import operation is performed only on the first call
  guard @python.pyimport("time") is Some(time_mod) else {
    println("Failed to load Python module: time")
    panic("ModuleLoadError")
  }
  let time_mod = TimeModule::{ time_mod }
  // The returned closure captures the time_mod variable
  fn () { time_mod }
}

// Create a global time_mod "getter" function
let time_mod: () -> TimeModule = import_time_mod()

In subsequent code, we should always call time_mod() to get the module, not import_time_mod.

Converting Between MoonBit and Python Objects

To call Python functions, we need to convert between MoonBit objects and Python objects (PyObject).

  1. Integers: Use PyInteger::from to create a PyInteger from an Int64, and to_int64() for the reverse conversion.

    test "py_integer_conversion" {
      let n: Int64 = 42
      let py_int = PyInteger::from(n)
      inspect(py_int, content="42")
      assert_eq(py_int.to_int64(), 42L)
    }
  2. Floats: Use PyFloat::from and to_double.

    test "py_float_conversion" {
      let n: Double = 3.5
      let py_float = PyFloat::from(n)
      inspect(py_float, content="3.5")
      assert_eq(py_float.to_double(), 3.5)
    }
  3. Strings: Use PyString::from and to_string.

    test "py_string_conversion" {
      let py_str = PyString::from("hello")
      inspect(py_str, content="'hello'")
      assert_eq(py_str.to_string(), "hello")
    }
  4. Lists: You can create an empty PyList and append elements, or create one directly from an Array[&IsPyObject].

    test "py_list_from_array" {
      let one = PyInteger::from(1)
      let two = PyFloat::from(2.0)
      let three = PyString::from("three")
      let arr: Array[&IsPyObject] = [one, two, three]
    
      let list = PyList::from(arr)
      inspect(list, content="[1, 2.0, 'three']")
    }
  5. Tuples: PyTuple requires specifying the size first, then filling elements one by one using the set method.

    test "py_tuple_creation" {
      let tuple = PyTuple::new(3)
      tuple
      ..set(0, PyInteger::from(1))
      ..set(1, PyFloat::from(2.0))
      ..set(2, PyString::from("three"))
    
      inspect(tuple, content="(1, 2.0, 'three')")
    }
  6. Dictionaries: PyDict mainly supports strings as keys. Use new to create a dictionary and set to add key-value pairs. For non-string keys, use set_by_obj.

    test "py_dict_creation" {
      let dict = PyDict::new()
      dict
      ..set("one", PyInteger::from(1))
      ..set("two", PyFloat::from(2.0))
    
      inspect(dict, content="{'one': 1, 'two': 2.0}")
    }

When getting elements from Python composite types, python.mbt performs runtime type checking and returns an Optional[PyObjectEnum] to ensure type safety.

test "py_list_get" {
  let list = PyList::new()
  list.append(PyInteger::from(1))
  list.append(PyString::from("hello"))

  inspect(list.get(0).unwrap(), content="PyInteger(1)")
  inspect(list.get(1).unwrap(), content="PyString('hello')")
  inspect(list.get(2), content="None") // Index out of bounds returns None
}

Calling Functions in a Module

Calling a function is a two-step process: first, get the function object with get_attr, then execute the call with invoke. The return value of invoke is a PyObject that requires pattern matching and type conversion.

Here is the MoonBit wrapper for time.sleep and time.time:

// Wrap time.sleep
pub fn sleep(seconds: Double) -> Unit {
  let lib = time_mod()
  guard lib.time_mod.get_attr("sleep") is Some(PyCallable(f)) else {
    println("get function `sleep` failed!")
    panic()
  }
  let args = PyTuple::new(1)
  args.set(0, PyFloat::from(seconds))
  match (try? f.invoke(args)) {
    Ok(_) => Ok(())
    Err(e) => {
      println("invoke `sleep` failed!")
      panic()
    }
  }
}

// Wrap time.time
pub fn time() -> Double {
  let lib = time_mod()
  guard lib.time_mod.get_attr("time") is Some(PyCallable(f)) else {
    println("get function `time` failed!")
    panic()
  }
  match (try? f.invoke()) {
    Ok(Some(PyFloat(t))) => t.to_double()
    _ => {
      println("invoke `time` failed!")
      panic()
    }
  }
}

After wrapping, we can use them in a type-safe way in MoonBit:

test "sleep" {
  let start = time().unwrap()
  sleep(1)
  let end = time().unwrap()

  println("start = \{start}")
  println("end = \{end}")
}

Practical Advice

  1. Define Clear Boundaries: Treat python.mbt as the "glue layer" connecting MoonBit and the Python ecosystem. Keep core computation and business logic in MoonBit to leverage its performance and type system advantages, and only use python.mbt when necessary to call Python-exclusive libraries.

  2. Use ADTs Instead of String Magic: Many Python functions accept specific strings as arguments to control behavior. In MoonBit wrappers, these "magic strings" should be converted to Algebraic Data Types (ADTs), i.e., enums. This leverages MoonBit's type system to move runtime value checks to compile time, greatly enhancing code robustness.

  3. Thorough Error Handling: The examples in this article use panic or return simple strings for brevity. In production code, you should define dedicated error types and pass and handle them through the Result type, providing clear error context.

  4. Map Keyword Arguments: Python functions extensively use keyword arguments (kwargs), such as plot(color='blue', linewidth=2). This can be elegantly mapped to MoonBit's Labeled Arguments. When wrapping, prioritize using labeled arguments to provide a similar development experience.

    For example, a Python function that accepts kwargs:

    # graphics.py
    def draw_line(points, color="black", width=1):
        # ... drawing logic ...
        print(f"Drawing line with color {color} and width {width}")

    Its MoonBit wrapper can be designed as:

    fn draw_line(points: Array[Point], color~: Color = Black, width: Int = 1) -> Unit {
      let points : PyList = ... // convert Array[Point] to PyList
    
      // construct args
      let args = PyTuple::new(1)
      args .. set(0, points)
    
      // construct kwargs
      let kwargs = PyDict::new()
      kwargs
      ..set("color", PyString::from(color))
      ...set("width", PyInteger::from(width))
      match (try? f.invoke(args~, kwargs~)) {
        Ok(_) => ()
        _ => {
          // handle error
        }
      }
    }
  5. Beware of Dynamism: Always remember that Python is dynamically typed. Any data obtained from Python should be treated as "untrusted" and must undergo strict type checking and validation. Avoid using unwrap as much as possible; instead, use pattern matching to safely handle all possible cases.

Conclusion

This article has outlined the working principles of python.mbt and demonstrated how to use it to call Python code in MoonBit, whether through pre-wrapped libraries or by interacting directly with Python modules. python.mbt is not just a tool; it represents a fusion philosophy: combining MoonBit's static analysis, high performance, and engineering advantages with Python's vast and mature ecosystem. We hope this article provides developers in the MoonBit and Python communities with a new, more powerful option for building future software.

A Guide to MoonBit C-FFI

· 16 min read


Introduction

MoonBit is a modern functional programming language featuring a robust type system, highly readable syntax, and a toolchain designed for AI. However, reinventing the wheel is not always the best approach. Countless time-tested, high-performance libraries are written in C (or languages with a C-compatible ABI, like C++, Rust). From low-level hardware manipulation to complex scientific computing and graphics rendering, the C ecosystem is a treasure trove of powerful tools.

So, can we make the modern MoonBit work in harmony with these classic C libraries, allowing the pioneers of the new world to wield the powerful tools of the old? The answer is a resounding yes. Through the C Foreign Function Interface (C-FFI), MoonBit can call C functions, bridging these two worlds.

This article will be your guide, leading you step-by-step through the mysteries of MoonBit's C-FFI. We will use a concrete example—creating MoonBit bindings for a C math library called mymath—to learn how to handle different data types, pointers, structs, and even function pointers.

Prerequisites

To connect to any C library, we need to know the functions in its header file, how to find the header file, and how to find the library file. For our task, the header file for the C math library is mymath.h. It defines the various functions and types we want to call from MoonBit. We'll assume mymath is installed on the system, and we'll use -I/usr/include to find the header file and -L/usr/lib -lmymath to link the library during compilation. Here is a part of our mymath.h:

// mymath.h

// --- Basic Functions ---
void print_version();
int version_major();
int is_normal(double input);

// --- Floating-Point Calculations ---
float sinf(float input);
float cosf(float input);
float tanf(float input);
double sin(double input);
double cos(double input);
double tan(double input);

// --- Strings and Pointers ---
int parse_int(char* str);
char* version();
int tan_with_errcode(double input, double* output);

// --- Array Operations ---
int sin_array(int input_len, double* inputs, double* outputs);
int cos_array(int input_len, double* inputs, double* outputs);
int tan_array(int input_len, double* inputs, double* outputs);

// --- Structs and Complex Types ---
typedef struct {
  double real;
  double img;
} Complex;

Complex* new_complex(double r, double i);
void multiply(Complex* a, Complex* b, Complex** result);
void init_n_complexes(int n, Complex** complex_array);

// --- Function Pointers ---
void for_each_complex(int n, Complex** arr, void (*call_back)(Complex*));

The Groundwork

Before writing any FFI code, we need to build the bridge between MoonBit and C code.

Compiling to Native

First, the MoonBit code needs to be compiled into native machine code. This can be done with the following command:

moon build --target native

This command will compile your MoonBit project into C code and then use the system's C compiler (like GCC or Clang) to compile it into a final executable. The compiled C files are located in the target/native/release/build/ directory, stored in subdirectories corresponding to the package name. For example, main/main.mbt will be compiled to target/native/release/build/main/main.c.

Configuring Linkage

Compilation alone is not enough. We also need to tell the MoonBit compiler how to find and link to our mymath library. This is configured in the project's moon.pkg.json file.

{
  "supported-targets": ["native"],
  "link": {
    "native": {
      "cc": "clang",
      "cc-flags": "-I/usr/include",
      "cc-link-flags": "-L/usr/lib -lmymath"
    }
  }
}
  • cc: Specifies the compiler to use for C code, e.g., clang or gcc.
  • cc-flags: Flags needed when compiling C files, typically used to specify header search paths (-I).
  • cc-link-flags: Flags needed during linking, typically used to specify library search paths (-L) and the specific libraries to link (-l).

We also need a "glue" C file, which we'll name cwrap.c, to include the C library's header file and MoonBit's runtime header file.

// cwrap.c
#include <mymath.h>
#include <moonbit.h>

This glue file also needs to be declared to the MoonBit compiler via moon.pkg.json:

{
  // ... other configurations
  "native-stub": ["cwrap.c"]
}

With these configurations in place, our project is ready to link with the mymath library.

The First FFI Call

With everything set up, let's make our first true cross-language call. To declare an external C function in MoonBit, the syntax is as follows:

extern "C" fn moonbit_function_name(arg: Type) -> ReturnType = "c_function_name"
  • extern "C": Tells the MoonBit compiler that this is an external C function.
  • moonbit_function_name: The function name used in the MoonBit code.
  • "c_function_name": The name of the C function to link to.

Let's try it out with the simplest function in mymath.h, version_major:

extern "C" fn version_major() -> Int = "version_major"

Note: MoonBit has powerful Dead Code Elimination (DCE). If you only declare the FFI function above but never actually call it in your code (e.g., in the main function), the compiler will consider it unused code and will not include its declaration in the final generated C code. So, make sure you call it at least once!

The real challenge lies in handling the data type differences between the two languages. For some complex type situations, readers will need some C language knowledge.

3.1 Basic Types

For basic numeric types, there is a direct and clear correspondence between MoonBit and C.

MoonBit TypeC TypeNotes
Intint32_t
Int64int64_t
UIntuint32_t
UInt64uint64_t
Floatfloat
Doubledouble
Boolint32_tThe C standard does not have a native bool, int32_t (0/1) is usually used.
Unitvoid (return value)Used to represent that a C function has no return value.
Byteuint8_t

Based on this table, we can easily write FFI declarations for most of the simple functions in mymath.h:

extern "C" fn print_version() -> Unit = "print_version"
extern "C" fn version_major() -> Int = "version_major"

// The return value is semantically a boolean, using MoonBit's Bool type is clearer
extern "C" fn is_normal(input: Double) -> Bool = "is_normal"

extern "C" fn sinf(input: Float) -> Float = "sinf"
extern "C" fn cosf(input: Float) -> Float = "cosf"
extern "C" fn tanf(input: Float) -> Float = "tanf"

extern "C" fn sin(input: Double) -> Double = "sin"
extern "C" fn cos(input: Double) -> Double = "cos"
extern "C" fn tan(input: Double) -> Double = "tan"

3.2 Strings

Things get interesting when we encounter strings. You might instinctively map C's char* to MoonBit's String, but this is a common pitfall.

MoonBit's String and C's char* have completely different memory layouts. char* is a pointer to a -terminated sequence of bytes, while MoonBit's String is a GC-managed, complex object containing length information and UTF-16 encoded data.

Passing Arguments: From MoonBit to C

When we need to pass a MoonBit string to a C function that accepts a char* (like parse_int), we need to perform a manual conversion. A recommended approach is to convert it to the Bytes type.

// A helper function to convert a MoonBit String to the null-terminated byte array expected by C
fn string_to_c_bytes(s: String) -> Bytes {
  let mut arr = s.to_bytes().to_array()
  // Ensure it's null-terminated
  if arr.last() != Some(0) {
    arr.push(0)
  }
  Bytes::from_array(arr)
}

// FFI declaration, note the parameter type is Bytes
#borrow(s) // Tell the compiler we are just borrowing s, don't increase its reference count
extern "C" fn __parse_int(s: Bytes) -> Int = "parse_int"

// Wrap it in a user-friendly MoonBit function
fn parse_int(str: String) -> Int {
  let s = string_to_c_bytes(str)
  __parse_int(s)
}

The #borrow Annotation The borrow annotation is an optimization hint. It tells the compiler that the C function only "borrows" this parameter and will not take ownership of it. This can avoid unnecessary reference counting operations and prevent potential memory leaks.

Return Values: From C to MoonBit

Conversely, when a C function returns a char* (like version), the situation is more complex. We absolutely must not declare it to return Bytes or String directly:

// Incorrect!
extern "C" fn version() -> Bytes = "version"

This is because the C function returns a raw pointer, which lacks the header information required by the MoonBit GC. A direct conversion like this will lead to a runtime crash.

The correct approach is to treat the returned char* as an opaque handle, and then write a conversion function in the C "glue" code to manually convert it into a valid MoonBit string.

MoonBit side:

// 1. Declare an external type to represent the C string pointer
#extern
type CStr

// 2. Declare an FFI function that calls the C wrapper
extern "C" fn CStr::to_string(self: Self) -> String = "cstr_to_moonbit_str"

// 3. Declare the original C function, which returns our opaque type
extern "C" fn __version() -> CStr = "version"

// 4. Wrap it in a safe MoonBit function
fn version() -> String {
  __version().to_string()
}

C side (add to cwrap.c):

#include <string.h> // for strlen

// This function is responsible for correctly converting a char* to a moonbit_string_t with a GC header
moonbit_string_t cstr_to_moonbit_str(char *ptr) {
  if (ptr == NULL) {
    return moonbit_make_string(0, 0);
  }
  int32_t len = strlen(ptr);
  // moonbit_make_string allocates a MoonBit string object with a GC header
  moonbit_string_t ms = moonbit_make_string(len, 0);
  for (int i = 0; i < len; i++) {
    ms[i] = (uint16_t)ptr[i]; // Assuming ASCII compatibility
  }
  // Note: Whether to free(ptr) depends on the C library's API contract.
  // If the memory returned by version() needs to be freed by the caller, it should be freed here.
  return ms;
}

This pattern, while a bit cumbersome at first glance, ensures memory safety and is the standard way to handle C string return values.

3.3 The Art of Pointers: Passing by Reference and Arrays

C extensively uses pointers for "output parameters" and passing arrays. MoonBit provides specialized types for this.

"Output" Parameters for a Single Value

When a C function uses a pointer to return an additional value, like tan_with_errcode(double input, double* output), MoonBit uses the Ref[T] type.

extern "C" fn tan_with_errcode(input: Double, output: Ref[Double]) -> Int = "tan_with_errcode"

Ref[T] in MoonBit is a struct containing a single field of type T. When passed to C, MoonBit passes the address of this struct. From C's perspective, a pointer to struct { T val; } is equivalent in memory address to a pointer to T, so it works directly.

Arrays: Passing Collections of Data

When a C function needs to process an array (e.g., double* inputs), MoonBit uses the FixedArray[T] type. FixedArray[T] is a contiguous block of T elements in memory, and its pointer can be passed directly to C.

extern "C" fn sin_array(len: Int, inputs: FixedArray[Double], outputs: FixedArray[Double]) -> Int = "sin_array"
extern "C" fn cos_array(len: Int, inputs: FixedArray[Double], outputs: FixedArray[Double]) -> Int = "cos_array"
extern "C" fn tan_array(len: Int, inputs: FixedArray[Double], outputs: FixedArray[Double]) -> Int = "tan_array"

3.4 External Types: Embracing Opaque C Structs

For C structs, like Complex, the best practice is usually to treat it as an "Opaque Type". We only create a reference (or handle) to it in MoonBit, without caring about its internal fields.

This is achieved with the #extern type syntax:

#extern
type Complex

This declaration tells MoonBit: "There is an external type named Complex. You don't need to know its internal structure, just treat it as a pointer-sized handle." In the generated C code, the Complex type will be treated as void*. This is usually safe because all operations on Complex are done within the C library, and the MoonBit side is only responsible for passing the pointer.

Based on this principle, we can write FFIs for the Complex-related functions in mymath.h:

// C: Complex* new_complex(double r, double i);
// Returns a pointer to Complex, which is a Complex handle in MoonBit
extern "C" fn new_complex(r: Double, i: Double) -> Complex = "new_complex"

// C: void multiply(Complex* a, Complex* b, Complex** result);
// Complex* corresponds to Complex, and Complex** corresponds to Ref[Complex]
extern "C" fn multiply(a: Complex, b: Complex, res: Ref[Complex]) -> Unit = "multiply"

// C: void init_n_complexes(int n, Complex** complex_array);
// Complex** is used as an array here, corresponding to FixedArray[Complex]
extern "C" fn init_n_complexes(n: Int, complex_array: FixedArray[Complex]) -> Unit = "init_n_complexes"

Best Practice: Encapsulate Raw FFIs Directly exposing FFI functions can be confusing for users (e.g., Ref and FixedArray). It is strongly recommended to build a more user-friendly API for MoonBit users on top of the FFI declarations.

// Define methods on the Complex type to hide FFI details
fn Complex::mul(self: Complex, other: Complex) -> Complex {
  // Create a temporary Ref to receive the result
  let res: Ref[Complex] = Ref::{ val: new_complex(0, 0) }
  multiply(self, other, res)
  res.val // Return the result
}

fn init_n(n: Int) -> Array[Complex] {
  // Use FixedArray::make to create the array
  let arr = FixedArray::make(n, new_complex(0, 0))
  init_n_complexes(n, arr)
  // Convert FixedArray to the more user-friendly Array
  Array::from_fixed_array(arr)
}

3.5 Function Pointers: When C Needs to Call Back

The most complex function in mymath.h is for_each_complex, which takes a function pointer as an argument.

void for_each_complex(int n, Complex** arr, void (*call_back)(Complex*));

A common misconception is to try to map MoonBit's closure type (Complex) -> Unit directly to a C function pointer. This is not possible because a MoonBit closure is internally a struct with two parts: a pointer to the actual function code, and a pointer to its captured environment data.

To pass a pure, environment-free function pointer, MoonBit provides the FuncRef type:

extern "C" fn for_each_complex(
  n: Int,
  arr: FixedArray[Complex],
  call_back: FuncRef[(Complex) -> Unit] // Use FuncRef to wrap the function type
) -> Unit = "for_each_complex"

Any function type wrapped in FuncRef will be converted to a standard C function pointer when passed to C.

How to declare a FuncRef? Just use let. As long as the function does not capture external variables, the declaration will succeed.

fn print_complex(c: Complex) -> Unit { ... }

fn main {
  let print_complex : FuncRef[(Complex) -> Unit] = (c) => print_complex(c)
  // ...
}

Advanced Topic: GC Management

We have covered most of the type conversion issues, but there is still a very important issue: memory management. C relies on manual malloc/free, while MoonBit has automatic garbage collection (GC). When a C library creates an object (like new_complex), who is responsible for freeing it?

Can we do without GC?

Some library authors may choose not to implement GC, leaving all destruction operations to the user. This approach has its merits in some libraries, such as some high-performance computing libraries, graphics libraries, etc. To improve performance or stability, they may abandon some GC features, but this raises the bar for programmers. Most libraries still need to provide GC to enhance the user experience.

Ideally, we want MoonBit's GC to automatically manage the lifecycle of these C objects. MoonBit provides two mechanisms to achieve this.

4.1 The Simple Case

If the C struct is very simple and you are sure that its memory layout is stable across all platforms, you can redefine it directly in MoonBit.

// mymath.h: typedef struct { double real; double img; } Complex;
// MoonBit:
struct Complex {
  r: Double,
  i: Double
}

By doing this, Complex becomes a true MoonBit object. The MoonBit compiler will automatically manage its memory and add a GC header. When you pass it to a C function, MoonBit will pass a pointer to its data part, which is usually feasible.

But this method has significant limitations:

  • It requires you to know the exact memory layout, alignment, etc., of the C struct, which can be fragile.
  • If a C function returns a Complex*, you cannot use it directly. You must, like handling string return values, write a C wrapper function to copy the data from the C struct into a newly created MoonBit Complex object with a GC header.

Therefore, this method is only suitable for the simplest cases. For most scenarios, we recommend a more robust finalizer solution.

4.2 The Complex Situation: Using Finalizers

This is a more general and safer method. The core idea is to create a MoonBit object to "wrap" the C pointer and tell the MoonBit GC that when this wrapper object is collected, a specific C function (a finalizer) should be called to release the underlying C pointer.

This process involves several steps:

1. Declare two types in MoonBit

#extern
type C_Complex // Represents the raw, opaque C pointer

type Complex C_Complex // A MoonBit type that wraps a C_Complex internally

type Complex C_Complex is a special declaration that creates a MoonBit object type named Complex, which has an internal field of type C_Complex. We can access this internal field with the .inner() method.

2. Provide a finalizer and wrapper functions in C

We need a C function to free the Complex object, and a function to create our GC-enabled MoonBit wrapper object.

C side (add to cwrap.c):

// The mymath library should provide a function to free Complex, let's assume it's free_complex
// void free_complex(Complex* c);

// We need a void* version of the finalizer for the MoonBit GC to use
void free_complex_finalizer(void* obj) {
    // The layout of a MoonBit external object is { void (*finalizer)(void*); T data; }
    // We need to extract the real Complex pointer from obj
    // Assuming the MoonBit Complex wrapper has only one field
    Complex* c_obj = *((Complex**)obj);
    free_complex(c_obj); // Call the real finalizer, if provided by the mymath library
    // free(c_obj); // If it was allocated with standard malloc
}

// Define what the MoonBit Complex wrapper looks like in C
typedef struct {
  Complex* val;
} MoonBit_Complex;

// Function to create the MoonBit wrapper object
MoonBit_Complex* new_mbt_complex(Complex* c_complex) {
  // `moonbit_make_external_obj` is the key
  // It creates a GC-managed external object and registers its finalizer.
  MoonBit_Complex* mbt_complex = moonbit_make_external_obj(
      &free_complex_finalizer,
      sizeof(MoonBit_Complex)
  );
  mbt_complex->val = c_complex;
  return mbt_complex;
}

3. Use the wrapper function in MoonBit

Now, instead of calling new_complex directly, we call our wrapper function new_mbt_complex.

// FFI declaration pointing to our C wrapper function
extern "C" fn __new_managed_complex(c_complex: C_Complex) -> Complex = "new_mbt_complex"

// The original C new_complex function returns a raw pointer
extern "C" fn __new_unmanaged_complex(r: Double, i: Double) -> C_Complex = "new_complex"

// The final, safe, GC-friendly new function provided to the user
fn Complex::new(r: Double, i: Double) -> Complex {
  let c_ptr = __new_unmanaged_complex(r, i)
  __new_managed_complex(c_ptr)
}

Now, when an object created by Complex::new is no longer used in MoonBit, the GC will automatically call free_complex_finalizer, safely freeing the memory allocated by the C library.

When we need to pass our managed Complex object to other C functions, we just use the .inner() method:

// Assume there is a C function `double length(Complex*);`
extern "C" fn length(c_complex: C_Complex) -> Double = "length"

fn Complex::length(self: Self) -> Double {
  // self.inner() returns the internal C_Complex (i.e., the C pointer)
  length(self.inner())
}

Conclusion

This article has guided you through the process of C-FFI in MoonBit, from basic types to complex struct types and function pointer types. Finally, it discussed the GC problem of MoonBit managing C objects. We hope this will be helpful for the library development of our readers.

Dancing with LLVM: A Moonbit Chronicle (Part 2) - LLVM Backend Generation

· 17 min read


Introduction

In the process of programming language design, the frontend is responsible for understanding and verifying the structure and semantics of a program, while the compiler backend takes on the task of translating these abstract concepts into executable machine code. The implementation of the backend not only requires a deep understanding of the target architecture but also mastery of complex optimization techniques to generate efficient code.

LLVM (Low Level Virtual Machine), as a comprehensive modern compiler infrastructure, provides us with a powerful and flexible solution. By converting a program into LLVM Intermediate Representation (IR), we can leverage LLVM's mature toolchain to compile the code to various target architectures, including RISC-V, ARM, and x86.

Moonbit's LLVM Ecosystem

Moonbit officially provides two important LLVM-related projects:

  • llvm.mbt: Moonbit language bindings for the original LLVM, providing direct access to the llvm-c interface. It requires the installation of the complete LLVM toolchain, can only generate for native backends, and requires you to handle compilation and linking yourself, but it can generate IR that is fully compatible with the original LLVM.
  • MoonLLVM: A pure Moonbit implementation of an LLVM-like system. It can generate LLVM IR without external dependencies and supports JavaScript and WebAssembly backends.

This article chooses llvm.mbt as our tool. Its API design is inspired by the highly acclaimed inkwell library in the Rust ecosystem.

In the previous article, "Dancing with LLVM: A Moonbit Chronicle (Part 1) - Implementing the Frontend," we completed the conversion from source code to a typed abstract syntax tree. This article will build on that achievement, focusing on the core techniques and implementation details of code generation.


Chapter 1: Representing the LLVM Type System in Moonbit

Before diving into code generation, we first need to understand how llvm.mbt represents LLVM's various concepts within Moonbit's type system. LLVM's type system is quite complex, containing multiple levels such as basic types, composite types, and function types.

Trait Objects: An Abstract Representation of Types

In the API design of llvm.mbt, you will frequently encounter the core concept of &Type. This is not a concrete struct or enum, but a Trait Object—which can be understood as the functional equivalent of an abstract base class in object-oriented programming.

// &Type is a trait object representing any LLVM type
let some_type: &Type = context.i32_type()

Type Identification and Conversion

To determine the specific type of a &Type, we need to perform a runtime type check using the as_type_enum interface:

pub fn identify_type(ty: &Type) -> String {
  match ty.as_type_enum() {
    IntType(int_ty) => "Integer type with \{int_ty.get_bit_width()} bits"
    FloatType(float_ty) => "Floating point type"
    PointerType(ptr_ty) => "Pointer type"
    FunctionType(func_ty) => "Function type"
    ArrayType(array_ty) => "Array type"
    StructType(struct_ty) => "Structure type"
    VectorType(vec_ty) => "Vector type"
    ScalableVectorType(svec_ty) => "Scalable vector type"
    MetadataType(meta_ty) => "Metadata type"
  }
}

Safe Type Conversion Strategies

When we are certain that a &Type has a specific type, there are several conversion methods to choose from:

  1. Direct Conversion (for deterministic scenarios)

    let ty: &Type = context.i32_type()
    let i32_ty = ty.into_int_type()  // Direct conversion, errors are handled by llvm.mbt
    let bit_width = i32_ty.get_bit_width()  // Call a method specific to IntType
  2. Defensive Conversion (recommended for production environments)

    let ty: &Type = get_some_type()  // An unknown type obtained from somewhere
    
    guard ty.as_type_enum() is IntType(i32_ty) else {
      raise CodeGenError("Expected integer type, got \{ty}")
    }
    
    // Now it's safe to use i32_ty
    let bit_width = i32_ty.get_bit_width()

Constructing Composite Types

LLVM supports various composite types, which are usually constructed through methods of basic types:

pub fn create_composite_types(context: @llvm.Context) -> Unit {
  let i32_ty = context.i32_type()
  let f64_ty = context.f64_type()

  // Array type: [16 x i32]
  let i32_array_ty = i32_ty.array_type(16)

  // Function type: i32 (i32, i32)
  let add_func_ty = i32_ty.fn_type([i32_ty, i32_ty])

  // Struct type: {i32, f64}
  let struct_ty = context.struct_type([i32_ty, f64_ty])

  // Pointer type (all pointers are opaque in LLVM 18+)
  let ptr_ty = i32_ty.ptr_type()

  // Output type information for verification
  println("Array type: \{i32_array_ty}")      // [16 x i32]
  println("Function type: \{add_func_ty}")    // i32 (i32, i32)
  println("Struct type: \{struct_ty}")        // {i32, f64}
  println("Pointer type: \{ptr_ty}")          // ptr
}

Important Reminder: Opaque Pointers

Starting with LLVM version 18, all pointer types use the opaque pointer design. This means that regardless of the type they point to, all pointers are represented as ptr in the IR, and the specific type information they point to is no longer visible in the type system.


Chapter 2: The LLVM Value System and the BasicValue Concept

Compared to the type system, LLVM's value system is more complex. llvm.mbt, consistent with inkwell, divides values into two important abstract layers: Value and BasicValue. The difference lies in distinguishing the source of value creation from the way values are used:

  • Value: Focuses on how a value is produced (e.g., constants, instruction results).
  • BasicValue: Focuses on what basic type a value has (e.g., integer, float, pointer).

Practical Application Example

pub fn demonstrate_value_system(context: Context, builder: Builder) -> Unit {
  let i32_ty = context.i32_type()

  // Create two integer constants - these are directly IntValue
  let const1 = i32_ty.const_int(10)  // Value: IntValue, BasicValue: IntValue
  let const2 = i32_ty.const_int(20)  // Value: IntValue, BasicValue: IntValue

  // Perform an addition operation - the result is an InstructionValue
  let add_result = builder.build_int_add(const1, const2)

  // In different contexts, we need different perspectives:

  // As an instruction to check its properties
  let instruction = add_result.as_instruction()
  println("Instruction opcode: \{instruction.get_opcode()}")

  // As a basic value to get its type
  let basic_value = add_result.into_basic_value()
  println("Result type: \{basic_value.get_type()}")

  // As an integer value for subsequent calculations
  let int_value = add_result.into_int_value()
  let final_result = builder.build_int_mul(int_value, const1)
}

Complete Classification of Value Types

  1. ValueEnum: All possible value types

    pub enum ValueEnum {
      IntValue(IntValue)              // Integer value
      FloatValue(FloatValue)          // Floating-point value
      PointerValue(PointerValue)      // Pointer value
      StructValue(StructValue)        // Struct value
      FunctionValue(FunctionValue)    // Function value
      ArrayValue(ArrayValue)          // Array value
      VectorValue(VectorValue)        // Vector value
      PhiValue(PhiValue)             // Phi node value
      ScalableVectorValue(ScalableVectorValue)  // Scalable vector value
      MetadataValue(MetadataValue)    // Metadata value
      CallSiteValue(CallSiteValue)    // Call site value
      GlobalValue(GlobalValue)        // Global value
      InstructionValue(InstructionValue)  // Instruction value
    } derive(Show)
  2. BasicValueEnum: Values that have a basic type

    pub enum BasicValueEnum {
      ArrayValue(ArrayValue)              // Array value
      IntValue(IntValue)                  // Integer value
      FloatValue(FloatValue)              // Floating-point value
      PointerValue(PointerValue)          // Pointer value
      StructValue(StructValue)            // Struct value
      VectorValue(VectorValue)            // Vector value
      ScalableVectorValue(ScalableVectorValue)  // Scalable vector value
    } derive(Show)

💡 Best Practices for Value Conversion

In the actual code generation process, we often need to convert between different value perspectives:

pub fn value_conversion_patterns(instruction_result: &Value) -> Unit {
  // Pattern 1: I know what type this is, convert directly
  let int_val = instruction_result.into_int_value()

  // Pattern 2: I just need a basic value, I don't care about the specific type
  let basic_val = instruction_result.into_basic_value()

  // Pattern 3: Defensive programming, check before converting
  match instruction_result.as_value_enum() {
    // Handle integer values
    IntValue(int_val) => handle_integer(int_val)
    // Handle float values
    FloatValue(float_val) => handle_float(float_val)
    _ => raise CodeGenError("Unexpected value type")
  }
}

Through this two-layer abstraction, llvm.mbt maintains the integrity of the LLVM value system while providing an intuitive and easy-to-use interface for Moonbit developers.


Chapter 3: Practical LLVM IR Generation

Now that we understand the type and value systems, let's demonstrate how to use llvm.mbt to generate LLVM IR with a complete example. This example will implement a simple muladd function, showing the entire process from initialization to instruction generation.

Infrastructure Initialization

Any LLVM program begins by establishing three core components:

pub fn initialize_llvm() -> (Context, Module, Builder) {
  // 1. Create an LLVM context - a container for all LLVM objects
  let context = @llvm.Context::create()

  // 2. Create a module - a container for functions and global variables
  let module = context.create_module("demo_module")

  // 3. Create an IR builder - used to generate instructions
  let builder = context.create_builder()

  (context, module, builder)
}

A Simple Function Generation Example

Let's implement a function that calculates (a * b) + c:

pub fn generate_muladd_function() -> String {
  // Initialize LLVM infrastructure
  let (context, module, builder) = initialize_llvm()

  // Define the function signature
  let i32_ty = context.i32_type()
  let func_type = i32_ty.fn_type([i32_ty, i32_ty, i32_ty])
  let func_value = module.add_function("muladd", func_type)

  // Create the function entry basic block
  let entry_block = context.append_basic_block(func_value, "entry")
  builder.position_at_end(entry_block)

  // Get the function parameters
  let arg_a = func_value.get_nth_param(0).unwrap().into_int_value()
  let arg_b = func_value.get_nth_param(1).unwrap().into_int_value()
  let arg_c = func_value.get_nth_param(2).unwrap().into_int_value()

  // Generate calculation instructions
  let mul_result = builder.build_int_mul(arg_a, arg_b).into_int_value()
  let add_result = builder.build_int_add(mul_result, arg_c)

  // Generate the return instruction
  let _ = builder.build_return(add_result)

  // Output the generated IR
  module.dump()
}

Generated LLVM IR

Running the above code will produce the following LLVM Intermediate Representation:

; ModuleID = 'demo_module'
source_filename = "demo_module"

define i32 @muladd(i32 %0, i32 %1, i32 %2) {
entry:
  %3 = mul i32 %0, %1
  %4 = add i32 %3, %2
  ret i32 %4
}

💡 Code Generation Best Practices

  1. Naming Conventions

    For instructions that return a value, the build interface has a name label argument, which can be used to add a name to the result of the instruction.

    let mul_result = builder.build_int_mul(lhs, rhs, name="temp_product")
    let final_result = builder.build_int_add(mul_result, offset, name="final_sum")
  2. Error Handling

    Use raise instead of panic for error handling, and manage exceptions for situations that are not easy to determine directly.

    // Check for operations that might fail
    match func_value.get_nth_param(index) {
      Some(param) => param.into_int_value()
      None => raise CodeGenError("Function parameter \{index} not found")
    }

Chapter 4: TinyMoonbit Compiler Implementation

Now let's turn our attention to the actual compiler implementation, converting the abstract syntax tree we built in the previous article into LLVM IR.

Type Mapping: From Parser to LLVM

First, we need to establish a mapping between the TinyMoonbit type system and the LLVM type system:

pub struct CodeGen {
  parser_program : Program                    // AST representation of the source program
  llvm_context : @llvm.Context               // LLVM context
  llvm_module : @llvm.Module                 // LLVM module
  builder : @llvm.Builder                    // IR builder
  llvm_functions : Map[String, @llvm.FunctionValue]  // Function map
}

pub fn convert_type(self : Self, parser_type : Type) -> &@llvm.Type raise {
  match parser_type {
    Type::Unit => self.llvm_context.void_type() as &@llvm.Type
    Type::Bool => self.llvm_context.bool_type()
    Type::Int => self.llvm_context.i32_type()
    Type::Double => self.llvm_context.f64_type()
    // Can be extended with more types as needed
  }
}

Environment Management: Mapping Variables to Values

During the code generation phase, we need to maintain a mapping from variable names to LLVM values:

pub struct Env {
  parent : Env?                        // Reference to the parent environment
  symbols : Map[String, &@llvm.Value]        // Local variable map

  // Global information
  codegen : CodeGen                           // Reference to the code generator
  parser_function : Function                  // AST of the current function
  llvm_function : @llvm.FunctionValue         // LLVM representation of the current function
}

pub fn get_symbol(self : Self, name : String) -> &@llvm.Value? {
  match self.symbols.get(name) {
    Some(value) => Some(value)
    None =>
      match self.parent {
        Some(parent_env) => parent_env.get_symbol(name)
        None => None
      }
  }
}

Variable Handling: Memory Allocation Strategy

As a systems-level language, TinyMoonbit supports variable reassignment. In LLVM IR's SSA (Static Single Assignment) form, we need to use the alloca + load/store pattern to implement mutable variables:

pub fn Stmt::emit(self : Self, env : Env) -> Unit raise {
  match self {
    // Variable declaration: e.g., let x : Int = 5;
    Let(var_name, var_type, init_expr) => {
      // Convert the type and allocate stack space
      let llvm_type = env.codegen.convert_type(var_type)
      let alloca = env.codegen.builder.build_alloca(llvm_type, var_name)

      // Record the allocated pointer in the symbol table
      env.symbols.set(var_name, alloca as &@llvm.Value)

      // Calculate the value of the initialization expression
      let init_value = init_expr.emit(env).into_basic_value()

      // Store the initial value into the allocated memory
      let _ = env.codegen.builder.build_store(alloca, init_value)
    }

    // Variable assignment: x = 10;
    Assign(var_name, rhs_expr) => {
      // Get the memory address of the variable from the symbol table
      guard let Some(var_ptr) = env.get_symbol(var_name) else {
        raise CodeGenError("Undefined variable: \{var_name}")
      }

      // Calculate the value of the right-hand side expression
      let rhs_value = rhs_expr.emit(env).into_basic_value()

      // Store the new value into the variable's memory
      let _ = env.codegen.builder.build_store(var_ptr, rhs_value)
    }

    // Other statement types...
    _ => { /* Handle other statements */ }
  }
}

Design Decision: Why use alloca?

In functional languages, immutable variables can be directly mapped to SSA values. However, TinyMoonbit supports variable reassignment, which conflicts with the SSA principle of "each variable is assigned only once."

The alloca + load/store pattern is the standard way to handle mutable variables:

  • alloca: Allocates memory space on the stack.
  • store: Writes a value to memory.
  • load: Reads a value from memory.

LLVM's optimization process will automatically convert simple allocas back to value form (the mem2reg optimization).

Expression Code Generation

Expression code generation is relatively straightforward, mainly involving calling the corresponding instruction-building methods based on the expression type:

fn Expr::emit(self: Self, env: Env) -> &@llvm.Value raise {
  match self {
    AtomExpr(atom_expr, ..) => atom_expr.emit(env)
    Unary("-", expr, ty = Some(Int)) => {
      let value = expr.emit().into_int_value()
      let zero = env.gen.llvm_ctx.i32_type().const_zero()
      env.gen.builder.build_int_sub(zero, value)
    }
    Unary("-", expr, ty = Some(Double)) => {
      let value = expr.emit().into_float_value()
      env.gen.builder.build_float_neg(value)
    }
    Binary("+", lhs, rhs, ty=Some(Int)) => {
      let lhs_val = lhs.emit().into_int_value()
      let rhs_val = rhs.emit().into_int_value()
      env.gen.builder.build_int_add(lhs_val, rhs_val)
    }
    // ... others
  }
}

Technical Detail: Floating-Point Negation

Note that when handling floating-point negation, we use build_float_neg instead of subtracting the operand from zero. This is because:

  1. IEEE 754 Standard: Floating-point numbers have special values (like NaN, ∞), and simple subtraction might produce incorrect results.
  2. Performance Considerations: Dedicated negation instructions are usually more efficient on modern processors.
  3. Precision Guarantee: Avoids unnecessary rounding errors.

Chapter 5: Implementation of Control Flow Instructions

Control flow is the backbone of program logic, including conditional branches and loop structures. In LLVM IR, control flow is implemented through Basic Blocks and branch instructions. Each basic block represents a sequence of instructions with no internal jumps, and blocks are connected by branch instructions.

Conditional Branches: Implementing if-else Statements

Conditional branches require creating multiple basic blocks to represent different execution paths:

fn Stmt::emit(self: Self, env: Env) -> Unit raise {
  let ctx = env.gen.llvm_ctx
  let func = env.llvm_func
  let builder = env.gen.builder
  match self {
    If(cond, then_stmts, else_stmts) => {
      let cond_val = cond.emit(env).into_int_value()

      // Create three basic blocks
      let then_block = ctx.append_basic_block(llvm_func)
      let else_block = ctx.append_basic_block(llvm_func)
      let merge_block = ctx.append_basic_block(llvm_func)

      // Create the jump instruction
      let _ = builder.build_conditional_branch(
        cond_val, then_block, else_block,
      )

      // Generate code for the then_block
      builder.position_at_end(then_block)
      let then_env = self.subenv()
      then_stmts.each(s => s.emitStmt(then_env))
      let _ = builder.build_unconditional_branch(merge_block)

      // Generate code for the else_block
      builder.position_at_end(else_block)
      let else_env = self.subenv()
      else_stmts.each(s => s.emitStmt(else_env))
      let _ = builder.build_unconditional_branch(merge_block)

      // After code generation is complete, the builder's position should be on the merge_block
      builder.position_at_end(merge_block)

    }
    // ...
  }
}

Generated LLVM IR Example

For the following TinyMoonbit code:

if x > 0 {
  y = x + 1;
} else {
  y = x - 1;
}

It will generate LLVM IR similar to this:

  %1 = load i32, ptr %x, align 4
  %2 = icmp sgt i32 %1, 0
  br i1 %2, label %if.then, label %if.else

if.then:                                          ; preds = %0
  %3 = load i32, ptr %x, align 4
  %4 = add i32 %3, 1
  store i32 %4, ptr %y, align 4
  br label %if.end

if.else:                                          ; preds = %0
  %5 = load i32, ptr %x, align 4
  %6 = sub i32 %5, 1
  store i32 %6, ptr %y, align 4
  br label %if.end

if.end:                                           ; preds = %if.else, %if.then
  ; Subsequent code...

Loop Structures: Implementing while Statements

The implementation of loops requires special attention to the correct connection of the condition check and the loop body:

fn Stmt::emit(self: Self, env: Env) -> Unit raise {
  let ctx = env.gen.llvm_ctx
  let func = env.llvm_func
  let builder = env.gen.builder
  match self {
    While(cond, body) => {
      // Generate three blocks
      let cond_block = ctx.append_basic_block(llvm_func)
      let body_block = ctx.append_basic_block(llvm_func)
      let merge_block = ctx.append_basic_block(llvm_func)

      // First, unconditionally jump to the cond block
      let _ = builder.build_unconditional_branch(cond_block)
      builder.position_at_end(cond_block)

      // Generate code within the cond block, as well as the conditional jump instruction
      let cond_val = cond.emit().into_int_value()
      let _ = builder.build_conditional_branch(
        cond_val, body_block, merge_block,
      )
      builder.position_at_end(body_block)

      // Generate code for the body block, with an unconditional jump to the cond block at the end
      let body_env = self.subenv()
      body.each(s => s.emitStmt(body_env))
      let _ = builder.build_unconditional_branch(cond_block)

      // After code generation is finished, jump to the merge block
      builder.position_at_end(merge_block)
    }
    // ...
  }
}

Generated LLVM IR Example

For the TinyMoonbit code:

while i < 10 {
  i = i + 1;
}

It will generate:

  br label %while.cond

while.cond:                                       ; preds = %while.body, %0
  %1 = load i32, ptr %i, align 4
  %2 = icmp slt i32 %1, 10
  br i1 %2, label %while.body, label %while.end

while.body:                                       ; preds = %while.cond
  %3 = load i32, ptr %i, align 4
  %4 = add i32 %3, 1
  store i32 %4, ptr %i, align 4
  br label %while.cond

while.end:                                        ; preds = %while.cond
  ; Subsequent code...

💡 Control Flow Design Points

  1. Basic Block Naming Strategy

    The append_basic_block function also has a name label argument.

    // Use descriptive block names for easier debugging and understanding
    let then_block = context.append_basic_block(func, name="if.then")
    let else_block = context.append_basic_block(func, name="if.else")
    let merge_block = context.append_basic_block(func, name="if.end")
  2. Scope Management

    // Create a separate scope for each branch and loop body
    let branch_env = env.sub_env()
    branch_stmts.each( stmt => stmt.emit(branch_env) }
  3. Builder Position Management

    At the end, be sure to place the instruction builder on the correct basic block.

    // Always ensure the builder points to the correct basic block
    builder.position_at_end(merge_block)
    // Generate instructions in this block...

Chapter 6: From LLVM IR to Machine Code

After generating the complete LLVM IR, we need to convert it into assembly code for the target machine. Although llvm.mbt provides a complete target machine configuration API, for learning purposes, we can use a simpler method.

Compiling with the llc Toolchain

The most direct method is to output the generated LLVM IR to a file and then use the LLVM toolchain to compile it:

Call the dump function of the Module, or you can use the println function.

let gen : CodeGen = ...
let prog = gen.llvm_prog
prog.dump() // dump is recommended as it will be slightly faster than println, with the same effect

// or println(prog)

Complete Compilation Flow Example

Let's look at a complete compilation flow from source code to assembly code:

  1. TinyMoonbit Source Code

    fn factorial(n: Int) -> Int {
      if n <= 1 {
        return 1;
      }
      return n * factorial(n - 1);
    }
    
    fn main() -> Unit {
      let result: Int = factorial(5);
      print_int(result);
    }
  2. Generated LLVM IR

    ; ModuleID = 'tinymoonbit'
    source_filename = "tinymoonbit"
    
    define i32 @factorial(i32 %0) {
    entry:
      %1 = alloca i32, align 4
      store i32 %0, ptr %1, align 4
      %2 = load i32, ptr %1, align 4
      %3 = icmp sle i32 %2, 1
      br i1 %3, label %4, label %6
    
    4:                                                ; preds = %entry
      ret i32 1
    
    6:                                                ; preds = %entry
      %7 = load i32, ptr %1, align 4
      %8 = load i32, ptr %1, align 4
      %9 = sub i32 %8, 1
      %10 = call i32 @factorial(i32 %9)
      %11 = mul i32 %7, %10
      ret i32 %11
    }
    
    define void @main() {
    entry:
      %0 = alloca i32, align 4
      %1 = call i32 @factorial(i32 5)
      store i32 %1, ptr %0, align 4
      %2 = load i32, ptr %0, align 4
      call void @print_int(i32 %2)
      ret void
    }
    
    declare void @print_int(i32 %0)
  3. Generating RISC-V Assembly with llc

    # Generate llvm ir
    moon run main --target native > fact.ll
    
    # Generate RISC-V 64-bit assembly code
    llc -march=riscv64 -mattr=+m -o fact.s fact.ll
  4. Generated RISC-V Assembly Snippet

    factorial:
    .Lfunc_begin0:
    	.cfi_startproc
    	addi	sp, sp, -32
    	.cfi_def_cfa_offset 32
    	sd	ra, 24(sp)
    	.cfi_offset ra, -8
    	sd	s0, 16(sp)
    	.cfi_offset s0, -16
    	addi	s0, sp, 32
    	.cfi_def_cfa s0, 0
    	sw	a0, -20(s0)
    	lw	a0, -20(s0)
    	li	a1, 1
    	blt	a1, a0, .LBB0_2
    	li	a0, 1
    	j	.LBB0_3
    .LBB0_2:
    	lw	a0, -20(s0)
    	lw	a1, -20(s0)
    	addi	a1, a1, -1
    	sw	a0, -24(s0)
    	mv	a0, a1
    	call	factorial
    	lw	a1, -24(s0)
    	mul	a0, a1, a0
    .LBB0_3:
    	ld	ra, 24(sp)
    	ld	s0, 16(sp)
    	addi	sp, sp, 32
    	ret

Conclusion

Through this two-part series, we have completed a fully functional, albeit simple, compiler implementation. From the lexical analysis of a character stream to the construction of an abstract syntax tree, and finally to the generation of LLVM IR and machine code output.

Review

Part 1:

  • An elegant lexer based on pattern matching
  • Implementation of a recursive descent parser
  • A complete type-checking system
  • Scope management with an environment chain

Part 2:

  • A deep dive into the LLVM type and value systems
  • Variable management strategies in SSA form
  • Correct implementation of control flow instructions
  • A complete code generation pipeline

Moonbit's Advantages in Compiler Development

Through this practical project, we have gained a deep appreciation for Moonbit's unique value in the field of compiler construction:

  1. Expressive Pattern Matching: Greatly simplifies the complexity of AST processing and type analysis.
  2. Functional Programming Paradigm: Immutable data structures and pure functions make the compiler logic clearer and more reliable.
  3. Modern Type System: Trait objects, generics, and error handling mechanisms provide ample abstraction capabilities.
  4. Excellent Engineering Features: Features like derive and JSON serialization significantly improve development efficiency.

Final Words

Compiler technology represents the perfect combination of computer science theory and engineering practice. With a modern tool like Moonbit, we can explore this ancient yet vibrant field in a more elegant and efficient way.

We hope this series of articles will provide readers with a powerful aid on their journey into compiler design.

Recommended Learning Resources


Dancing with LLVM: A Moonbit Chronicle (Part 1) - Implementing the Frontend

· 16 min read


Introduction

Programming language design and compiler implementation have long been considered among the most challenging topics in computer science. The traditional path to learning compilers often requires students to first master a complex set of theoretical foundations:

  • Automata Theory: Finite state machines and regular expressions
  • Type Theory: The mathematical underpinnings of λ-calculus and type systems
  • Computer Architecture: Low-level implementation from assembly language to machine code

However, Moonbit, a functional programming language designed for the modern development landscape, offers a fresh perspective. It not only features a rigorous type system and exceptional memory safety guarantees but, more importantly, its rich syntax and toolchain tailored for the AI era make it an ideal choice for learning and implementing compilers.

Series Overview This series of articles will delve into the core concepts and best practices of modern compiler implementation by building a small programming language compiler called TinyMoonbit.

  • Part 1: Focuses on the implementation of the language frontend, including lexical analysis, parsing, and type checking, ultimately generating an abstract syntax tree with complete type annotations.
  • Part 2: Dives into the code generation phase, utilizing Moonbit's official llvm.mbt binding library to convert the abstract syntax tree into LLVM intermediate representation and finally generate RISC-V assembly code.

TinyMoonbit Language Design

TinyMoonbit is a systems-level programming language with an abstraction level comparable to C. Although its syntax heavily borrows from Moonbit, TinyMoonbit is not a subset of the Moonbit language. Instead, it is a simplified version designed to test the feature completeness of llvm.mbt while also serving an educational purpose.

Note: Due to space constraints, the TinyMoonbit implementation discussed in this series is simpler than the actual TinyMoonbit. For the complete version, please refer to TinyMoonbitLLVM.

Core Features

TinyMoonbit provides the fundamental features required for modern systems programming:

  • Low-level Memory Operations: Direct pointer manipulation and memory management
  • Control Flow Structures: Conditional branches, loops, and function calls
  • Type Safety: Static type checking and explicit type declarations
  • Simplified Design: To reduce implementation complexity, advanced features like type inference and closures are not supported.

Syntax Example

Let's demonstrate TinyMoonbit's syntax with a classic implementation of the Fibonacci sequence:

extern fn print_int(x : Int) -> Unit;

// Recursive implementation of the Fibonacci sequence
fn fib(n : Int) -> Int {
  if n <= 1 {
    return n;
  }
  return fib(n - 1) + fib(n - 2);
}

fn main {
  print_int(fib(10));
}

Compilation Target

After the complete compilation process, the above code will generate the following LLVM Intermediate Representation:

; ModuleID = 'tinymoonbit'
source_filename = "tinymoonbit"

define i32 @fib(i32 %0) {
entry:
  %1 = alloca i32, align 4
  store i32 %0, ptr %1, align 4
  %2 = load i32, ptr %1, align 4
  %3 = icmp sle i32 %2, 1
  br i1 %3, label %4, label %6

4:                                                ; preds = %entry
  %5 = load i32, ptr %1, align 4
  ret i32 %5

6:                                                ; preds = %4, %entry
  %7 = load i32, ptr %1, align 4
  %8 = sub i32 %7, 1
  %9 = call i32 @fib(i32 %8)
  %10 = load i32, ptr %1, align 4
  %11 = sub i32 %10, 2
  %12 = call i32 @fib(i32 %11)
  %13 = add i32 %9, %12
  ret i32 %13
}

define void @main() {
entry:
  %0 = call i32 @fib(i32 10)
  call void @print_int(i32 %0)
}

declare void @print_int(i32 %0)

Chapter 2: Lexical Analysis

Lexical Analysis is the first stage of the compilation process. Its core mission is to convert a continuous stream of characters into a sequence of meaningful tokens. This seemingly simple conversion process is, in fact, the cornerstone of the entire compiler pipeline.

From Characters to Symbols: Token Design and Implementation

Consider the following code snippet:

let x : Int = 5;

After being processed by the lexer, it will produce the following sequence of tokens:

(Keyword "let") → (Identifier "x") → (Symbol ":") →
(Type "Int") → (Operator "=") → (IntLiteral 5) → (Symbol ";")

This conversion process needs to handle various complex situations:

  1. Whitespace Filtering: Skipping spaces, tabs, and newlines.
  2. Keyword Recognition: Distinguishing reserved words from user-defined identifiers.
  3. Numeric Parsing: Correctly identifying the boundaries of integers and floating-point numbers.
  4. Operator Handling: Differentiating between single-character and multi-character operators.

Token Type System Design

Based on the TinyMoonbit syntax specification, we classify all possible symbols into the following token types:

pub enum Token {
  Bool(Bool)       // Boolean values: true, false
  Int(Int)         // Integers: 1, 2, 3, ...
  Double(Double)   // Floating-point numbers: 1.0, 2.5, 3.14, ...
  Keyword(String)  // Reserved words: let, if, while, fn, return
  Upper(String)    // Type identifiers: start with an uppercase letter, e.g., Int, Double, Bool
  Lower(String)    // Variable identifiers: start with a lowercase letter, e.g., x, y, result
  Symbol(String)   // Operators and punctuation: +, -, *, :, ;, ->
  Bracket(Char)    // Brackets: (, ), [, ], {, }
  EOF              // End-of-file marker
} derive(Show, Eq)

Leveraging Pattern Matching

Moonbit's powerful pattern matching capabilities allow us to implement the lexer in an unprecedentedly elegant way. Compared to the traditional finite state machine approach, this pattern-matching-based implementation is more intuitive and easier to understand.

Core Analysis Function

pub fn lex(code: String) -> Array[Token] {
  let tokens = Array::new()

  loop code[:] {
    // Skip whitespace characters
    [' ' | '\n' | '\r' | '\t', ..rest] =>
      continue rest

    // Handle single-line comments
    [.."//", ..rest] =>
      continue loop rest {
        ['\n' | '\r', ..rest_str] => break rest_str
        [_, ..rest_str] => continue rest_str
        [] as rest_str => break rest_str
      }

    // Recognize multi-character operators (order is important!)
    [.."->", ..rest] => { tokens.push(Symbol("->")); continue rest }
    [.."==", ..rest] => { tokens.push(Symbol("==")); continue rest }
    [.."!=", ..rest] => { tokens.push(Symbol("!=")); continue rest }
    [.."<=", ..rest] => { tokens.push(Symbol("<=")); continue rest }
    [..">=", ..rest] => { tokens.push(Symbol(">=")); continue rest }

    // Recognize single-character operators and punctuation
    [':' | '.' | ',' | ';' | '+' | '-' | '*' |
     '/' | '%' | '>' | '<' | '=' as c, ..rest] => {
      tokens.push(Symbol("\{c}"))
      continue rest
    }

    // Recognize brackets
    ['(' | ')' | '[' | ']' | '{' | '}' as c, ..rest] => {
      tokens.push(Bracket(c))
      continue rest
    }

    // Recognize identifiers and literals
    ['a'..='z', ..] as code => {
      let (tok, rest) = lex_ident(code);
      tokens.push(tok)
      continue rest
    }

    ['A'..='Z', ..] => { ... }
    ['0'..='9', ..] => { ... }

    // Reached the end of the file
    [] => { tokens.push(EOF); break tokens }
  }
}

Keyword Recognition Strategy

Identifier parsing requires special handling for keyword recognition:

pub fn let_ident(rest: @string.View) -> (Token, @string.View) {
  // Predefined keyword map
  let keyword_map = Map.from_array([
    ("let", Token::Keyword("let")),
    ("fn", Token::Keyword("fn")),
    ("if", Token::Keyword("if")),
    ("else", Token::Keyword("else")),
    ("while", Token::Keyword("while")),
    ("return", Token::Keyword("return")),
    ("extern", Token::Keyword("extern")),
    ("true", Token::Bool(true)),
    ("false", Token::Bool(false)),
  ])

  let identifier_chars = Array::new()
  let remaining = loop rest {
    ['a'..='z' | 'A'..='Z' | '0'..='9' | '_' as c, ..rest_str] => {
      identifier_chars.push(c)
      continue rest_str
    }
    _ as rest_str => break rest_str
  }

  let ident = String::from_array(identifier_chars)
  let token = keyword_map.get(ident).or_else(() => Token::Lower(ident))

  (token, remaining)
}

💡 In-depth Analysis of Moonbit Syntax Features

The implementation of the lexer above fully demonstrates several outstanding advantages of Moonbit in compiler development:

  1. Functional Loop Construct

    loop initial_value {
      pattern1 => continue new_value1
      pattern2 => continue new_value2
      pattern3 => break final_value
    }

    loop is not a traditional loop structure but a functional loop:

    • It accepts an initial parameter as the loop state.
    • It handles different cases through pattern matching.
    • continue passes the new state to the next iteration.
    • break terminates the loop and returns the final value.
  2. String Views and Pattern Matching

    Moonbit's string pattern matching feature greatly simplifies text processing:

    // Match a single character
    ['a', ..rest] => // Starts with the character 'a'
    
    // Match a character range
    ['a'..='z' as c, ..rest] => // A lowercase letter, bound to the variable c
    
    // Match a string literal
    [.."hello", ..rest] => // Equivalent to ['h','e','l','l','o', ..rest]
    
    // Match multiple possible characters
    [' ' | '\t' | '\n', ..rest] => // Any whitespace character
  3. The Importance of Pattern Matching Priority

    ⚠️ Important Reminder: The order of matching is crucial.

    When writing pattern matching rules, you must place more specific patterns before more general ones. For example:

    // ✅ Correct order
    loop code[:] {
      [.."->", ..rest] => { ... }     // Match multi-character operators first
      ['-' | '>' as c, ..rest] => { ... }  // Then match single characters
    }
    
    // ❌ Incorrect order - "->" will never be matched
    loop code[:] {
      ['-' | '>' as c, ..rest] => { ... }
      [.."->", ..rest] => { ... }     // This will never be executed
    }

By using this pattern-matching-based approach, we not only avoid complex state machine implementations but also achieve a clearer and more maintainable code structure.


Chapter 3: Parsing and Abstract Syntax Tree Construction

Syntactic Analysis (or Parsing) is the second core stage of the compiler. Its task is to reorganize the sequence of tokens produced by lexical analysis into a hierarchical Abstract Syntax Tree (AST). This process not only verifies whether the program conforms to the language's grammatical rules but also provides a structured data representation for subsequent semantic analysis and code generation.

Abstract Syntax Tree Design: A Structured Representation of the Program

Before building the parser, we need to carefully design the structure of the AST. This design determines how the program's syntactic structure is represented and how subsequent compilation stages will process these structures.

1. Core Type System

First, we define the representation of the TinyMoonbit type system in the AST:

pub enum Type {
  Unit    // Unit type, represents no return value
  Bool    // Boolean type: true, false
  Int     // 32-bit signed integer
  Double  // 64-bit double-precision floating-point number
} derive(Show, Eq, ToJson)

pub fn parse_type(type_name: String) -> Type {
  match type_name {
    "Unit" => Type::Unit
    "Bool" => Type::Bool
    "Int" => Type::Int
    "Double" => Type::Double
    _ => abort("Unknown type: \{type_name}")
  }
}

2. Layered AST Node Design

We use a layered design to clearly represent the different abstraction levels of the program:

  1. Atomic Expressions (AtomExpr) Represent the most basic, indivisible expression units:

    pub enum AtomExpr {
      Bool(Bool)                                    // Boolean literal
      Int(Int)                                      // Integer literal
      Double(Double)                                // Floating-point literal
      Var(String, mut ty~ : Type?)                  // Variable reference
      Paren(Expr, mut ty~ : Type?)                  // Parenthesized expression
      Call(String, Array[Expr], mut ty~ : Type?)    // Function call
    } derive(Show, Eq, ToJson)
  2. Compound Expressions (Expr) More complex structures that can contain operators and multiple sub-expressions:

    pub enum Expr {
      AtomExpr(AtomExpr, mut ty~ : Type?)          // Wrapper for atomic expressions
      Unary(String, Expr, mut ty~ : Type?)         // Unary operation: -, !
      Binary(String, Expr, Expr, mut ty~ : Type?)  // Binary operation: +, -, *, /, ==, !=, etc.
    } derive(Show, Eq, ToJson)
  3. Statements (Stmt) Represent executable units in the program:

    pub enum Stmt {
      Let(String, Type, Expr)                      // Variable declaration: let x : Int = 5;
      Assign(String, Expr)                         // Assignment statement: x = 10;
      If(Expr, Array[Stmt], Array[Stmt])           // Conditional branch: if-else
      While(Expr, Array[Stmt])                     // Loop statement: while
      Return(Expr?)                                // Return statement: return expr;
      Expr(Expr)                                   // Expression statement
    } derive(Show, Eq, ToJson)
  4. Top-Level Structures Function definitions and the complete program:

    pub struct Function {
      name : String                     // Function name
      params : Array[(String, Type)]    // Parameter list: [(param_name, type)]
      ret_ty : Type                     // Return type
      body : Array[Stmt]                // Sequence of statements in the function body
    } derive(Show, Eq, ToJson)
    
    // The program is defined as a map from function names to function definitions
    pub type Program Map[String, Function]

Design Highlight: Mutability of Type Annotations

Notice that each expression node contains a mut ty~ : Type? field. This design allows us to fill in type information during the type-checking phase without having to rebuild the entire AST.

Recursive Descent Parsing: A Top-Down Construction Strategy

Recursive Descent is a top-down parsing method where the core idea is to write a corresponding parsing function for each grammar rule. In Moonbit, pattern matching makes the implementation of this method exceptionally elegant.

Parsing Atomic Expressions

pub fn parse_atom_expr(
  tokens: ArrayView[Token]
) -> (AtomExpr, ArrayView[Token]) raise {
  match tokens {
    // Parse literals
    [Bool(b), ..rest] => (AtomExpr::Bool(b), rest)
    [Int(i), ..rest] => (AtomExpr::Int(i), rest)
    [Double(d), ..rest] => (AtomExpr::Double(d), rest)

    // Parse function calls: func_name(arg1, arg2, ...)
    [Lower(func_name), Bracket('('), ..rest] => {
      let (args, rest) = parse_argument_list(rest)
      match rest {
        [Bracket(')'), ..remaining] =>
          (AtomExpr::Call(func_name, args, ty=None), remaining)
        _ => raise SyntaxError("Expected ')' after function arguments")
      }
    }

    // Parse variable references
    [Lower(var_name), ..rest] =>
      (AtomExpr::Var(var_name, ty=None), rest)

    // Parse parenthesized expressions: (expression)
    [Bracket('('), ..rest] => {
      let (expr, rest) = parse_expression(rest)
      match rest {
        [Bracket(')'), ..remaining] =>
          (AtomExpr::Paren(expr, ty=None), remaining)
        _ => raise SyntaxError("Expected ')' after expression")
      }
    }

    _ => raise SyntaxError("Expected atomic expression")
  }
}

Parsing Statements

Statement parsing needs to dispatch to different handler functions based on the starting keyword:

pub fn parse_stmt(tokens : ArrayView[Token]) -> (Stmt, ArrayView[Token]) {
  match tokens {
    // Parse let statements
    [Keyword("let"), Lower(var_name), Symbol(":"), ..] => { /* ... */ }

    // Parse if/while/return statements
    [Keyword("if"), .. rest] => parse_if_stmt(rest)
    [Keyword("while"), .. rest] => parse_while_stmt(rest)
    [Keyword("return"), .. rest] => { /* ... */ }

    // Parse assignment statements
    [Lower(_), Symbol("="), .. rest] => parse_assign_stmt(tokens)

    // Parse single expression statements
    [Lower(_), Symbol("="), .. rest] => parse_single_expr_stmt(tokens)

    _ => { /* Error handling */ }
  }
}

Challenge: Handling Operator Precedence:

The most complex part of expression parsing is handling operator precedence. We need to ensure that 1 + 2 * 3 is correctly parsed as 1 + (2 * 3) and not (1 + 2) * 3.

💡 Application of Advanced Moonbit Features

Automatic Derivation Feature

pub enum Expr {
  // ...
} derive(Show, Eq, ToJson)

Moonbit's derive feature automatically generates common implementations for types. Here we use three:

  • Show: Provides debugging output functionality.
  • Eq: Supports equality comparison.
  • ToJson: Serializes to JSON format, which is convenient for debugging and persistence.

These automatically generated features are extremely useful in compiler development, especially during the debugging and testing phases.

Error Handling Mechanism

pub fn parse_expression(tokens: ArrayView[Token]) -> (Expr, ArrayView[Token]) raise {
  // The 'raise' keyword indicates that this function may throw an exception
}

Moonbit's raise mechanism provides structured error handling, allowing syntax errors to be accurately located and reported.

Through this layered design and recursive descent parsing strategy, we have built a parser that is both flexible and efficient, laying a solid foundation for the subsequent type-checking phase.


Chapter 4: Type Checking and Semantic Analysis

Semantic Analysis is a crucial intermediate stage in compiler design. While parsing ensures the program's structure is correct, it doesn't mean the program is semantically valid. Type Checking, as the core component of semantic analysis, is responsible for verifying the type consistency of all operations in the program, ensuring type safety and runtime correctness.

Scope Management: Building the Environment Chain

The primary challenge in type checking is correctly handling variable scopes. At different levels of the program (global, function, block), the same variable name may refer to different entities. We adopt the classic design of an Environment Chain to solve this problem:

pub struct TypeEnv[K, V] {
  parent : TypeEnv[K, V]?     // Reference to the parent environment
  data : Map[K, V]            // Variable bindings in the current environment
}

The core of the environment chain is the variable lookup algorithm, which follows the rules of lexical scoping:

pub fn TypeEnv::get[K : Eq + Hash, V](self : Self[K, V], key : K) -> V? {
  match self.data.get(key) {
    Some(value) => Some(value)    // Found in the current environment
    None =>
      match self.parent {
        Some(parent_env) => parent_env.get(key)  // Recursively search the parent environment
        None => None              // Reached the top-level environment, variable not defined
      }
  }
}

Design Principle: Lexical Scoping

This design ensures that variable lookup follows lexical scoping rules:

  1. First, search in the current scope.
  2. If not found, recursively search in the parent scope.
  3. Continue until the variable is found or the global scope is reached.

Type Checker Architecture

Environment management alone is not sufficient to complete the type-checking task. Some operations (like function calls) need to access global program information. Therefore, we design a comprehensive type checker:

pub struct TypeChecker {
  local_env : TypeEnv[String, Type]    // Local variable environment
  current_func : Function              // The function currently being checked
  program : Program                    // Complete program information
}

Implementation of Partial Node Type Checking

The core of the type checker is to apply the corresponding type rules to different AST nodes. The following is the implementation of expression type checking:

pub fn Expr::check_type(
  self : Self,
  env : TypeEnv[String, Type]
) -> Type raise {
  match self {
    // Type checking for atomic expressions
    AtomExpr(atom_expr, ..) as node => {
      let ty = atom_expr.check_type(env)
      node.ty = Some(ty)  // Fill in the type information
      ty
    }

    // Type checking for unary operations
    Unary("-", expr, ..) as node => {
      let ty = expr.check_type(env)
      node.ty = Some(ty)
      ty
    }

    // Type checking for binary operations
    Binary("+", lhs, rhs, ..) as node => {
      let lhs_type = lhs.check_type(env)
      let rhs_type = rhs.check_type(env)

      // Ensure operand types are consistent
      guard lhs_type == rhs_type else {
        raise TypeCheckError(
          "Binary operation requires matching types, got \{lhs_type} and \{rhs_type}"
        )
      }

      let result_type = match op {
        // Comparison operators always return a boolean value
        "==" | "!=" | "<" | "<=" | ">" | ">=" => Type::Bool

        // Arithmetic operators, etc., maintain the operand type
        _ => lhs_type
      }

      node.ty = Some(result_type)
      result_type
    }
  }
}

💡 Moonbit Enum Modification Trick

During the type-checking process, we need to fill in type information for the AST nodes. Moonbit provides an elegant way to modify the mutable fields of enum variants:

pub enum Expr {
  AtomExpr(AtomExpr, mut ty~ : Type?)
  Unary(String, Expr, mut ty~ : Type?)
  Binary(String, Expr, Expr, mut ty~ : Type?)
} derive(Show, Eq, ToJson)

By using the as binding in pattern matching, we can get a reference to the enum variant and modify its mutable fields:

match expr {
  AtomExpr(atom_expr, ..) as node => {
    let ty = atom_expr.check_type(env)
    node.ty = Some(ty)  // Modify the mutable field
    ty
  }
  // ...
}

This design avoids the overhead of rebuilding the entire AST while maintaining a functional programming style.


Complete Compilation Flow Demonstration

After the three stages of lexical analysis, parsing, and type checking, our compiler frontend is now able to convert source code into a fully typed abstract syntax tree. Let's demonstrate the complete process with a simple example:

Source Code Example

fn add(x: Int, y: Int) -> Int {
  return x + y;
}

Compilation Output: Typed AST

Using the derive(ToJson) feature, we can output the final AST in JSON format for inspection:

{
  "functions": {
    "add": {
      "name": "add",
      "params": [
        ["x", { "$tag": "Int" }],
        ["y", { "$tag": "Int" }]
      ],
      "ret_ty": { "$tag": "Int" },
      "body": [
        {
          "$tag": "Return",
          "0": {
            "$tag": "Binary",
            "0": "+",
            "1": {
              "$tag": "AtomExpr",
              "0": {
                "$tag": "Var",
                "0": "x",
                "ty": { "$tag": "Int" }
              },
              "ty": { "$tag": "Int" }
            },
            "2": {
              "$tag": "AtomExpr",
              "0": {
                "$tag": "Var",
                "0": "y",
                "ty": { "$tag": "Int" }
              },
              "ty": { "$tag": "Int" }
            },
            "ty": { "$tag": "Int" }
          }
        }
      ]
    }
  }
}

From this JSON output, we can clearly see:

  1. Complete Function Signature: Including the parameter list and return type.
  2. Type-Annotated AST Nodes: Each expression carries type information.
  3. Structured Program Representation: Provides a clear data structure for the subsequent code generation phase.

Conclusion

In this article, we have delved into the complete implementation process of a compiler frontend. From a stream of characters to a typed abstract syntax tree, we have witnessed the unique advantages of the Moonbit language in compiler construction:

Core Takeaways

  1. The Power of Pattern Matching: Moonbit's string pattern matching and structural pattern matching greatly simplify the implementation of lexical analysis and parsing.
  2. Functional Programming Paradigm: The combination of the loop construct, environment chains, and immutable data structures provides a solution that is both elegant and efficient.
  3. Expressive Type System: Through mutable fields in enums and trait objects, we can build data structures that are both type-safe and flexible.
  4. Engineering Features: Features like derive, structured error handling, and JSON serialization significantly improve development efficiency.

Looking Ahead to Part 2

Having mastered the implementation of the frontend, the next article will guide us into the more exciting code generation phase. We will:

  • Delve into the design philosophy of LLVM Intermediate Representation.
  • Explore how to use Moonbit's official llvm.mbt binding library.
  • Implement the complete conversion from AST to LLVM IR.
  • Generate executable RISC-V assembly code.

Building a compiler is a complex and challenging process, but as we have shown in this article, Moonbit provides powerful and elegant tools for this task. Let's continue this exciting compiler construction journey in the next part.

Recommended Resources


Dependency Injection in FP: The Reader Monad

· 10 min read

Developers familiar with hexagonal architecture know that to keep core business logic pure and independent, we place "side effects" like database calls and external API interactions into "ports" and "adapters." These are then injected into the application layer using Dependency Injection (DI). It's safe to say that classic object-oriented and layered architectures rely heavily on DI.

But when I started building things in MoonBit, I had no idea.

I wanted to follow best practices in a functionally-oriented environment like MoonBit, but with no classes, no interfaces, and no DI containers, how was I supposed to implement DI?

This led me to a crucial question: In a field as mature as software engineering, was there truly no established, functional-native solution for something as fundamental as dependency injection?

The answer is a resounding yes. In the functional world, this solution is a monad: the Reader Monad.

First, What is a Monad?

A Monad can be understood as a "wrapper" or a "context."

Think of a normal function as an assembly line. You put a bag of flour in at one end and expect instant noodles to come out the other. But this simple picture hides the complexities the assembly line has to handle:

  • What if there's no flour? (null)
  • What if the dough is too dry and jams the machine? (Throwing exceptions)
  • The ingredient machine needs to read today's recipe is it beef or chicken flavor? (Reading external configuration)
  • The packaging machine at the end needs to log how many packages it has processed today. (Updating a counter)

Monad is the master control system for this complex assembly line. It bundles your data together with the context of the processing flow, ensuring the entire process runs smoothly and safely.

In software development, the Monad family has several common members:

  • Option(Maybe): Handles cases where a value might be missing. The box either has something in it or it's empty.
  • Result(Either): Handles operations that might fail. The box is either green (success) and contains a result, or it's red (failure) and contains an error.
  • State Monad: Manages situations that require modifying state. This box produces a result while also updating a counter on its side. Think of React's useState.
  • Future (or Promise): Deals with values that will exist in the future. This box gives you a "pickup slip," promising to deliver the goods later.
  • Reader Monad: The box can consult an "environment" at any time, but it cannot modify it.

The Reader Monad

The idea behind the Reader Monad dates back to the 1990s, gaining popularity in purely functional languages like Haskell. To uphold the strict rule of "purity" (i.e., functions cannot have side effects), developers needed an elegant way for multiple functions to share a common configuration environment. The Reader Monad was born to resolve this tension.

And today, its applications are widespread:

  • Application Configuration Management: Passing around global configurations like database connection pools, API keys, or feature flags.
  • Request Context Injection: In web services, bundling information like the currently logged-in user into an environment that can be accessed by all functions in the request handling chain.
  • Hexagonal Architecture: It's used to create a firewall between the core business logic (Domain/Application Layer) and external infrastructure (Infrastructure Layer).

In short, the Reader Monad is a specialized tool for handling read-only environmental dependencies. It solves two key problems:

  • Parameter Drilling: It saves us from passing a configuration object down through many layers of functions.
  • Decoupling Logic and Configuration: Business logic cares about what to do, not where the configuration comes from. This keeps the code clean and extremely easy to test.

The Core API

A Reader library typically includes a few core functions.

Reader::pure

This is like placing a value directly into a standard container. It takes an ordinary value and wraps it into the simplest possible Reader computation—one that doesn't depend on any environment. pure is often the last step in a pipeline, taking your final calculated result and putting it back into the Reader context, effectively "packaging" it.

typealias @reader.Reader

// `pure` creates a computation that ignores the environment.
let pure_reader : Reader[String, Int] = Reader::pure(100)

test {
  // No matter what the environment is (e.g., "hello"), the result is always 100.
  assert_eq(pure_reader.run("hello"), 100)
}

Reader::bind

This is the "connector" of the assembly line. It links different processing steps together, like connecting the "kneading" step to the "rolling" step to form a complete production line. Its purpose is sequencing. bind handles the plumbing behind the scenes; you define the steps, and it ensures the output of one computation is passed as the input to the next.

fnalias @reader.ask

// Step 1: Define a Reader that reads a value from the environment (an Int).
let step1 : Reader[Int, Int] = ask()

// Step 2: Define a function that takes the result of Step 1
// and returns a new Reader computation.
fn step2_func(n : Int) -> Reader[Int, Int] {
  Reader::pure(n * 2)
}

// Use `bind` to chain the two steps together.
let computation : Reader[Int, Int] = step1.bind(step2_func)

test {
  // Run the entire computation with an environment of 5.
  // Flow: `ask()` gets 5 from the environment -> `bind` passes 5 to `step2_func`
  // -> `step2_func` calculates 5*2=10 -> the result is `pure(10)`.
  assert_eq(computation.run(5), 10)
}

Reader::map

This is like changing the value inside the container without touching the container itself. It simply transforms the result. Often, we just want to perform a simple conversion on a result, and using map is more direct and expresses intent more clearly than using the more powerful bind.

// `map` transforms the result without affecting the dependency.
let reader_int : Reader[Unit, Int] = Reader::pure(5)

let reader_string : Reader[Unit, String] = reader_int.map(fn(n) {
  "Value is \{n}"
})

test {
  assert_eq(reader_string.run(()), "Value is 5")
}

ask

ask is like a worker on the assembly line who can, at any moment, look up at the "production recipe" hanging on the wall. This is our primary means of actually reading from the environment. While bind passes the environment along implicitly, ask is what you use when you need to explicitly find out what's written in that recipe.

// `ask` retrieves the entire environment.
let ask_reader : Reader[String, String] = ask()
let result: String = ask_reader.run("This is the environment")

test {
  assert_eq(result, "This is the environment")
}

A common helper, asks, is just a convenient shorthand for chaining ask and map.

DI vs. Reader Monad

Let's consider a classic example: developing a UserService that needs a Logger to record logs and a Database to fetch data.

In a traditional DI setup, you might have a UserService class that declares its Logger and Database dependencies in its constructor. At runtime, you create instances of the logger and database and "inject" them when creating the UserService instance.

interface Logger {
  info(message: string): void
}
interface Database {
  getUserById(id: number): { name: string } | undefined
}

class UserService {
  constructor(
    private logger: Logger,
    private db: Database
  ) {}

  getUserName(id: number): string | undefined {
    this.logger.info(`Querying user with id: ${id}`)
    const user = this.db.getUserById(id)
    return user?.name
  }
}

const myLogger: Logger = { info: (msg) => console.log(`[LOG] ${msg}`) }
const myDb: Database = {
  getUserById: (id) => (id === 1 ? { name: 'MoonbitLang' } : undefined)
}

const userService = new UserService(myLogger, myDb)
const userName = userService.getUserName(1) // "MoonbitLang"

With the Reader Monad, the approach is different. The getUserName function doesn't hold any dependencies itself. Instead, it's defined as a "computation description." It declares that it needs an AppConfig environment (which contains the logger and database) to run. This function is completely decoupled from the concrete implementations of its dependencies.

fnalias @reader.asks

struct User {
  name : String
}

trait Logger {
  info(Self, String) -> Unit
}

trait Database {
  getUserById(Self, Int) -> User?
}

struct AppConfig {
  logger : &Logger
  db : &Database
}

fn getUserName(id : Int) -> Reader[AppConfig, String?] {
  asks(config => {
    config.logger.info("Querying user with id: \{id}")
    let user = config.db.getUserById(id)
    user.map(obj => obj.name)
  })
}

struct LocalDB {}

impl Database for LocalDB with getUserById(_, id) {
  if id == 1 {
    Some({ name: "MoonbitLang" })
  } else {
    None
  }
}

struct LocalLogger {}

impl Logger for LocalLogger with info(_, content) {
  println("\{content}")
}

test "Test UserName" {
  let appConfig = AppConfig::{ db: LocalDB::{  }, logger: LocalLogger::{  } }
  assert_eq(getUserName(1).run(appConfig).unwrap(), "MoonbitLang")
}

This characteristic makes the Reader Monad a perfect match for hexagonal architecture. The core principle of this architecture is Dependency Inversion — the core business logic should not depend on concrete infrastructure.

The getUserName function is a prime example. It only depends on the AppConfig abstraction (the "port"), with no knowledge of whether the underlying implementation is MySQL, PostgreSQL, or a mock database for testing.

But what problem can't it solve? State modification.

The environment in a Reader Monad is always "read-only." Once injected, it cannot be changed throughout the computation. If you need a mutable state, you'll have to turn to its sibling, the State Monad.

So, the benefit is clear: you can read configuration from anywhere in your computation. The drawback is just as clear too: it can only read.

A Simple i18n Utility

Frontend developers are likely familiar with libraries like i18next for internationalization (i18n). The core pattern involves injecting an i18n instance into the entire application using something like React Context. Any component can then access translation functions from this context. This is, in essence, a form of dependency injection.

This brings us back to our original goal: finding a DI pattern to support i18n in a CLI tool. Here’s a simple demonstration.

So first, let's install the dependencies.

moon add colmugx/reader

And then, we define the environment and dictionary types our i18n library will need. The environment, which we can call I18nConfig, would hold the current language (e.g., "en_US") and a dictionary. The dictionary would be a map of locales to their respective translation maps, where each translation map holds key-value pairs of translation keys and their translated strings.

typealias String as Locale

typealias String as TranslationKey

typealias String as TranslationValue

typealias Map[TranslationKey, TranslationValue] as Translations

typealias Map[Locale, Translations] as Dict

struct I18nConfig {
  // 'mut' is used here for demonstration purposes to easily change the language.
  mut lang : Locale
  dict : Dict
}

Next, we create our translation function, t. This function takes a translation key as input and returns a Reader. This Reader describes a computation that, when run, will use asks to access the I18nConfig from the environment. It will look up the current language, find the corresponding dictionary, and then find the translation for the given key. If anything is not found, it gracefully defaults to returning the original key.

fn t(key : TranslationKey) -> Reader[I18nConfig, TranslationValue] {
  asks(config => config.dict
    .get(config.lang)
    .map(lang_map => lang_map.get(key).unwrap_or(key))
    .unwrap_or(key))
}

And that's it. The core logic is surprisingly simple.

Now, let's imagine our CLI tool needs to display a welcome message in the language specified by the operating system's LANG environment variable.

We can define a welcome_message function that takes some content as input. It uses our t function to get the translation for the "welcome" key and then uses bind to chain another Reader computation that combines the translated text with the provided content.

RUN IT

fn welcome_message(content : String) -> Reader[I18nConfig, String] {
  t("welcome").bind(welcome_text => Reader::pure("\{welcome_text} \{content}"))
}

test {
  let dict : Dict = {
    "en_US": { "welcome": "Welcome To" },
    "zh_CN": { "welcome": "欢迎来到" },
  }

  // Assuming your system language (LANG) is zh_CN
  let app_config = I18nConfig::{ lang: "zh_CN", dict }
  let msg = welcome_message("MoonbitLang")
  assert_eq(msg.run(app_config), "欢迎来到 MoonbitLang")

  // Switch the language
  app_config.lang = "en_US"
  assert_eq(msg.run(app_config), "Welcome To MoonbitLang")
}

And with that, I'd like to say: Welcome to MoonbitLang.

MoonBit Pearls Vol 4: Choreographic Programming with Moonchor

· 24 min read

Traditional distributed programming is notoriously painful, primarily because we need to reason about the implicit global behavior while writing the explicit local programs that actually run on each node. This fragmented implementation makes programs difficult to debug, understand, and deprives them of type-checking provided by programming languages. Choreographic Programming makes the global behavior explicit by allowing developers to write a single program that requires communication across multiple participants, which is then projected onto each participant to achieve global behavior.

Choreographic programming is implemented in two distinct approaches:

  • As a completely new programming language (e.g., Choral), where developers write Choral programs that will be compiled into participant-specific Java programs.
  • As a library (e.g., HasChor), leveraging Haskell's type system to ensure static properties of choreographic programming while seamlessly integrating with Haskell's ecosystem.

MoonBit's ​​functional programming features​​ and ​​powerful type system​​ make it particularly suitable for building choreographic programming libraries.

This article demonstrates the core concepts and basic usage of choreographic programming using MoonBit's moonchor library through several examples.

Guided Tour: Bookstore Application

Let's examine a bookstore application involving two roles: Buyer and Seller. The core logic is as follows:

  1. The buyer sends the desired book title to the seller.
  2. The seller queries the database and informs the buyer of the price.
  3. The buyer decides whether to purchase the book.
  4. If the buyer decides to purchase, the seller deducts the book from inventory and sends the estimated delivery date to the buyer.
  5. Otherwise, the interaction terminates.

Traditional Implementation

Here, we focus on core logic rather than implementation details, using send and recv functions to represent message passing. In the traditional approach, we need to develop two separate applications for buyer and seller. We assume the following helper functions and types exist:

fn get_title() -> String {
  "Homotopy Type Theory"
}

fn get_price(title : String) -> Int {
  50
}

fn get_budget() -> Int {
  100
}

fn get_delivery_date(title : String) -> String {
  "2025-10-01"
}

enum Role {
  Buyer
  Seller
}

async fn[T] send(msg : T, target : Role) -> Unit {
  ...
}

async fn[T] recv(source : Role) -> T {
  ...
}

The buyer's application:

async fn book_buyer() -> Unit {
  let title = get_title()
  send(title, Seller)
  let price = recv(Seller)
  if price <= get_budget() {
    send(true, Seller)
    let delivery_date = recv(Seller)
    println("The book will be delivered on: \{delivery_date}")
  } else {
    send(false, Seller)
  }
}

The seller's application:

async fn book_seller() -> Unit {
  let title = recv(Buyer)
  let price = get_price(title)
  send(price, Buyer)
  let decision = recv(Buyer)
  if decision {
    let delivery_date = get_delivery_date(title)
    send(delivery_date, Buyer)
  }
}

These two implementations suffer from at least the following issues:

  1. No type safety guarantee: Note that both send and recv are generic functions. Type safety is only ensured when the types of sending and receiving messages match; otherwise, runtime errors may occur during (de)serialization. The compiler cannot verify type safety at compile time because it cannot determine which send corresponds to which recv. Type safety is dependent on the developer not making mistakes.

  2. Potential deadlocks: If the developer accidentally forgets to write some send in the buyer's program, both buyer and seller may wait indefinitely for each other's messages and be stuck. Alternatively, if a buyer's connection is temporarily interrupted during network communication, the seller will keep waiting for the buyer's message. Both scenarios lead to deadlocks.

  3. Explicit synchronization required: To communicate the purchase decision, the buyer must explicitly send a Bool message. Subsequent coordination requires ensuring both buyer and seller follow the same execution path at the if price <= get_budget() and if decision branches - a property that cannot be guaranteed at compile time.

The root cause of these problems lies in splitting what should be a unified coordination logic into two separate implementations based on implementation requirements. Next, we'll examine how choreographic programming addresses these issues.

moonchor Implementation

With choreographic programming, we can write the buyer's and seller's logic in the same function, which then exhibits different behaviors with different parameters when called. We use moonchor's API to define the buyer and seller roles. In moonchor, roles are defined as trait Location. To provide better static properties, roles are not only values but also unique types that need to implement the Location trait.

struct Buyer {} derive(Show, Hash)

impl @moonchor.Location for Buyer with name(_) {
  "buyer"
}

struct Seller {} derive(Show, Hash)

impl @moonchor.Location for Seller with name(_) {
  "seller"
}

let buyer : Buyer = Buyer::{  }

let seller : Seller = Seller::{  }

Buyer and Seller types don't contain any fields. Types implementing the Location trait only need to provide a name method that returns a string as the role's identifier. This name method is critically important - it serves as the definitive identity marker for roles and provides a final verification mechanism when type checking cannot guarantee type safety. Never assign the same name to different roles, as this will lead to unexpected runtime errors. Later we'll examine how types provide a certain level of safety and why relying solely on types is insufficient.

Next, we define the core logic of the bookstore application, which is referred to as a choreography:

async fn bookshop(ctx : @moonchor.ChoreoContext) -> Unit {
  let title_at_buyer = ctx.locally(buyer, _unwrapper => get_title())
  let title_at_seller = ctx.comm(buyer, seller, title_at_buyer)
  let price_at_seller = ctx.locally(seller, fn(unwrapper) {
    let title = unwrapper.unwrap(title_at_seller)
    get_price(title)
  })
  let price_at_buyer = ctx.comm(seller, buyer, price_at_seller)
  let decision_at_buyer = ctx.locally(buyer, fn(unwrapper) {
    let price = unwrapper.unwrap(price_at_buyer)
    price < get_budget()
  })
  if ctx.broadcast(buyer, decision_at_buyer) {
    let delivery_date_at_seller = ctx.locally(seller, unwrapper => get_delivery_date(
      unwrapper.unwrap(title_at_seller),
    ))
    let delivery_date_at_buyer = ctx.comm(
      seller, buyer, delivery_date_at_seller,
    )
    ctx.locally(buyer, fn(unwrapper) {
      let delivery_date = unwrapper.unwrap(delivery_date_at_buyer)
      println("The book will be delivered on \{delivery_date}")
    })
    |> ignore
  }
}

This program is somewhat lengthy, so let's analyze it line by line.

The function parameter ctx: @moonchor.ChoreoContext is the context object provided by moonchor to applications, containing all interfaces for choreographic programming on the application side. First, we use ctx.locally to execute an operation get_title() that only needs to run at the buyer role. The first parameter of ctx.locally is the role. The second parameter is a closure where the content is the operation to execute, with the return value being wrapped as the return value of ctx.locally. Here, get_title() returns a String, while title_at_buyer has type @moonchor.Located[String, Buyer], indicating this value exists at the buyer role and cannot be used by other roles. If you attempt to use title_at_buyer at the seller role, the compiler will report an error stating that Buyer and Seller are not the same type.

Next, the buyer needs to send the book title to the seller, which we implement using ctx.comm. The first parameter of ctx.comm is the sender role, the second is the receiver role, and the third is the message to send. Here, the return value title_at_seller has type @moonchor.Located[String, Seller], indicating this value exists at the seller role. As you might have guessed, ctx.comm corresponds precisely to the send and recv operations. However, here type safety is guaranteed: ctx.comm is a generic function that ensures (1) the sent and received messages have the same type, and (2) the sender and receiver roles correspond to the type parameters of the parameter and return types, namely @moonchor.Located[T, Sender] and @moonchor.Located[T, Receiver].

Moving forward, the seller queries the database to get the book price. At this step we use the unwrapper parameter passed to the ctx.locally closure. This parameter is an object for unpacking Located types, whose type signature also includes a role type parameter. We can understand how it works by examining the signature of Unwrapper::unwrap: fn[T, L] Unwrapper::unwrap(_ : Unwrapper[L], v : Located[T, L]) -> T. This means in ctx.locally(buyer, unwrapper => ...), unwrapper has type Unwrapper[Buyer], while title_at_seller has type Located[String, Seller], so unwrapper.unwrap(title_at_seller) yields a result of type String. This explains why we can use title_at_seller in the closure but not title_at_buyer.

Knowledge of Choice

Explicit synchronization in the subsequent process is critical. We need a dedicated section to explain that. In choreographic programming, this synchronization is referred to as Knowledge of Choice. In the example above, the buyer needs to know whether to purchase the book, and the seller needs to know the buyer's decision. We use ctx.broadcast to implement this functionality.

The first parameter of ctx.broadcast is the sender's role, and the second parameter is the message to be shared with all other roles. In this example, both buyer and seller need to know the purchase decision, so the buyer broadcasts this decision decision_at_buyer to all participants (here only the seller) via ctx.broadcast. Interestingly, the return value of broadcast is a plain type rather than a Located type, meaning it can be used by all roles directly at the top level without needing to be unwrapped with unwrapper in locally. This allows us to use MoonBit's native if conditional statements for subsequent flows, ensuring both buyer and seller follow the same branch.

As the name suggests, ctx.broadcast serves to broadcast a value throughout the entire choreography. It can broadcast not just Bool types but any other type as well. Its results can be applied not only to if conditions but also to while loops or any other scenarios requiring common knowledge.

Launch Code

How does such a choreography run? moonchor provides the run_choreo function to launch a choreography. Currently, due to MoonBit's multi-backend feature, providing stable, portable TCP servers and cross-process communication interfaces presents challenges. Therefore, we'll use coroutines and channels to explore the actual execution process of choreographies. The complete launch code is as follows:

test "Blog: bookshop" {
  let backend = @moonchor.make_local_backend([buyer, seller])
  @toolkit.run_async(() => @moonchor.run_choreo(backend, bookshop, buyer) )
  @toolkit.run_async(() => @moonchor.run_choreo(backend, bookshop, seller) )
}

The above code launches two coroutines that execute the same choreography at the buyer and seller respectively. This can also be understood as the bookshop function being projected (also called EPP, endpoint projection) into two completely different versions: the "buyer version" and "seller version". In this example, the first parameter of run_choreo is a Backend type object that provides the underlying communication mechanism required for choreographic programming. We use the make_local_backend function to create a local backend (not to be confused with MoonBit's multi-backend mentioned earlier), which can run in local processes using the channel API provided by peter-jerry-ye/async/channel as the communication foundation. In the future, moonchor will provide more backend implementations, such as HTTP.

API and Partial Principles

We have gained a preliminary understanding of choreographic programming and moonchor. Next, we will formally introduce the APIs we've used along with some unused ones, while explaining some of their underlying principles.

Roles

In moonchor, we define roles by implementing the Location trait. The trait is declared as follows:

pub(open) trait Location: Show + Hash {
  name(Self) -> String
}

The Location trait object implements Eq:

impl Eq for &Location with op_equal(self, other) {
  self.name() == other.name()
}

If two roles' name methods return the same string, they are considered the same role; otherwise, they are not. When determining whether a value belongs to a certain role, the name method serves as the definitive arbiter. This means values can have the same type but actually represent different roles. This feature is particularly important when handling dynamically generated roles. For example, in the bookstore scenario, there might be multiple buyers, and the seller needs to handle multiple buyer requests simultaneously, dynamically generating buyer roles based on server connections. In this case, the buyer type would be defined as:

struct DynamicBuyer {
  id : String
} derive(Show, Hash)

impl @moonchor.Location for DynamicBuyer with name(self) {
  "buyer-\{self.id}"
}

Located Values

Since values located at different roles may coexist in a choreography, we need a way to distinguish which role each value is located at. In moonchor, this is represented by the Located[T, L] type, indicating a value of type T located at role L.

type Located[T, L]

type Unwrapper[L]

Located Values are constructed via ChoreoContext::locally or ChoreoContext::comm. Both functions return a Located value.

To use a Located Value, we employ the unwrap method of the Unwrapper object. These concepts have already been demonstrated in the bookstore application example and won't be elaborated further here.

Local Computation

The most common API we've seen in examples is ChoreoContext::locally, which is used to perform a local computation at a specific role. Its signature is as follows:

type ChoreoContext

fn[T, L : Location] locally(
  self : ChoreoContext,
  location : L,
  computation : (Unwrapper[L]) -> T
) -> Located[T, L] {
  ...
}

This API executes the computation closure at the specified location role and wraps the result as a Located Value. The computation closure takes a single parameter - an unwrapper object of type Unwrapper[L], which is used within the closure to unpack Located[T, L] values into T types. This API binds computation results to specific roles, ensuring values can only be used at their designated roles. Attempting to use a value at another role or process values from different roles with this unwrapper will trigger compiler errors.

Communication

The ChoreoContext::comm API handles value transmission between roles. Its declaration is as follows:

trait Message: ToJson + @json.FromJson {}

async fn[T : Message, From : Location, To : Location] comm(
  self : ChoreoContext,
  from : From,
  to : To,
  value : Located[T, From]
) -> Located[T, To] {
  ...
}

Sending and receiving typically require serialization and deserialization. In moonchor's current implementation, Json is the message carrier for convenience. In the future, byte streams may be adopted as a more efficient and universal carrier.

ChoreoContext::comm has three type parameters: the message type to send, plus the sender and receiver role types From and To. These two role types correspond exactly to the method's from parameter, to parameter, as well as the value parameter and return value type. This ensures type safety during message (de)serialization between sender and receiver, and guarantees send/receive operations are properly paired, preventing accidental deadlocks.

Broadcast

When needing to share a value among multiple roles, we use the ChoreoContext::broadcast API to have a role broadcast a value to all other roles. Its signature is as follows:

async fn[T : Message, L : Location] ChoreoContext::broadcast(
  self : ChoreoContext,
  loc : L,
  value : Located[T, L]
) -> T {
  ...
}

The broadcast API is similar to the communication API, with two key differences:

  1. Broadcast doesn't require specifying receiver roles - it defaults to all roles in the choreography;
  2. The broadcast return value isn't a Located Value, but rather the message's type.

These characteristics reveal broadcast's purpose: enabling all roles to access the same value, allowing operations on this value at the choreography's top level rather than being confined within ChoreoContext::locally. For example, in the bookstore case, both buyer and seller need consensus on the purchase decision to ensure subsequent processes remain synchronized.

Backend and Execution

The API for running a choreography is as follows:

type Backend

typealias async (ChoreoContext) -> T as Choreo[T]

async fn[T, L : Location] run_choreo(
  backend : Backend,
  choreography : Choreo[T],
  role : L
) -> T {
  ...
}

It takes three parameters: a backend, a user-written choreography, and the role to execute. The backend contains the concrete implementation of the communication mechanism, while the execution role specifies where this choreography should run. For example, in previous cases, the buyer's program needs to pass a value of type Buyer here, while the seller needs to pass a value of type Seller.

moonchor provides a local backend based on coroutines and channels:

fn make_local_backend(locations: Array[&Location]) -> Backend {
  ...
}

This function establishes communication channels between all roles specified in the parameters, providing concrete communication implementations - namely the send and recv methods. The local backend can only be used for monolithic concurrent programs rather than true distributed applications. Well, the backend is pluggable: With other backends implemented based on stable network communication APIs, moonchor can easily be used to build distributed programs.

(Optional Reading) Case Study: Multi-Replica KVStore

In this section, we'll explore a more complicated case study - implementing a multi-replica KVStore using moonchor. We'll still only use moonchor's core APIs while fully leveraging MoonBit's generics and first-class functions. Our goal is to explore how MoonBit's powerful expressiveness can enhance choreographic programming functionalities.

Basic Implementation

First, let's prepare by defining two roles: Client and Server:

struct Server {} derive(Hash, Show)

struct Client {} derive(Hash, Show)

impl @moonchor.Location for Server with name(_) {
  "server"
}

impl @moonchor.Location for Client with name(_) {
  "client"
}

let server : Server = Server::{  }

let client : Client = Client::{  }

To implement a KVStore like Redis, we need to implement two basic interfaces: get and put (corresponding to Redis's get and set). The simplest implementation uses a Map data structure to store key-value pairs:

struct ServerState {
  db: Map[String, Int]
}

fn ServerState::new() -> ServerState {
  { db: {} }
}

For the KVStore, get and put requests are sent by clients over the network. Before receiving requests, we don't know their specific content. Therefore, we need to define a request type Request that includes the request type and parameters:

enum Request {
  Get(String)
  Put(String, Int)
} derive(ToJson, FromJson)

For convenience, our KVStore only supports String keys and Int values. Next, we define a Response type to represent the server's response to requests:

typealias Int? as Response

The response is an optional integer. For Put requests, the response is None; for Get requests, the response is the corresponding value wrapped in Some, or None if the key doesn't exist.

fn handle_request(state : ServerState, request : Request) -> Response {
  match request {
    Request::Get(key) => state.db.get(key)
    Request::Put(key, value) => {
      state.db[key] = value
      None
    }
  }
}

Our goal is to define two functions, put and get, to simulate the client's request initiation process. Their respective tasks are:

  1. Generate the request at the Client, wrapping the key-value pair;
  2. Send the request to the Server;
  3. The Server processes the request using the handle_request function;
  4. Send the response back to the Client.

As we can see, the logic of put and get functions is similar. We can abstract the three processes (2, 3, and 4) into a single function called access_server.

async fn put_v1(
  ctx : @moonchor.ChoreoContext,
  state_at_server : @moonchor.Located[ServerState, Server],
  key : String,
  value : Int
) -> Unit {
  let request = ctx.locally(client, _unwrapper => Request::Put(key, value))
  access_server_v1(ctx, request, state_at_server) |> ignore
}

async fn get_v1(
  ctx : @moonchor.ChoreoContext,
  state_at_server : @moonchor.Located[ServerState, Server],
  key : String
) -> @moonchor.Located[Response, Client] {
  let request = ctx.locally(client, _unwrapper => Request::Get(key))
  access_server_v1(ctx, request, state_at_server)
}

async fn access_server_v1(
  ctx : @moonchor.ChoreoContext,
  request : @moonchor.Located[Request, Client],
  state_at_server : @moonchor.Located[ServerState, Server]
) -> @moonchor.Located[Response, Client] {
  let request_at_server = ctx.comm(client, server, request)
  let response = ctx.locally(server, fn(unwrapper) {
    let request = unwrapper.unwrap(request_at_server)
    let state = unwrapper.unwrap(state_at_server)
    handle_request(state, request)
  })
  ctx.comm(server, client, response)
}

With this, our KVStore implementation is complete. We can write a simple choreography to test it:

async fn kvstore_v1(ctx : @moonchor.ChoreoContext) -> Unit {
  let state_at_server = ctx.locally(server, _unwrapper => ServerState::new())
  put_v1(ctx, state_at_server, "key1", 42)
  put_v1(ctx, state_at_server, "key2", 41)
  let v1_at_client = get_v1(ctx, state_at_server, "key1")
  let v2_at_client = get_v1(ctx, state_at_server, "key2")
  ctx.locally(client, fn(unwrapper) {
    let v1 = unwrapper.unwrap(v1_at_client).unwrap()
    let v2 = unwrapper.unwrap(v2_at_client).unwrap()
    if v1 + v2 == 83 {
      println("The server is working correctly")
    } else {
      panic()
    }
  })
  |> ignore
}

test "kvstore v1" {
  let backend = @moonchor.make_local_backend([server, client])
  @toolkit.run_async(() => @moonchor.run_choreo(backend, kvstore_v1, server))
  @toolkit.run_async(() => @moonchor.run_choreo(backend, kvstore_v1, client))
}

This program stores two numbers 42 and 41 under "key1" and "key2" respectively, then retrieves these values from the server and verifies their sum equals 83. If any request returns None or the calculation result isn't 83, the program will panic.

Double Replication

Now, let's enhance the KVStore with fault tolerance. The simplest approach is to create a backup replica that maintains identical data to the primary replica, while performing consistency checks during Get requests.

We'll create a new role for the backup replica:

struct Backup {} derive(Hash, Show)

impl @moonchor.Location for Backup with name(_) {
  "backup"
}

let backup : Backup = Backup::{  }

Define a function to check consistency: this function verifies whether all replica responses are identical, and panics if inconsistencies are found.

fn check_consistency(responses: Array[Response]) -> Unit {
  match responses.pop() {
    None => return
    Some(f) =>
      for res in responses {
        if res != f {
          panic()
        }
      }
  }
}

Most other components remain unchanged. We only need to add replica handling in the access_server function. The new access_server_v2 logic works as follows: after receiving a request, the Server forwards it to Backup; then Server and Backup process the request separately; after processing, Backup sends the response back to Server, where Server performs consistency checks on both results.

async fn put_v2(
  ctx : @moonchor.ChoreoContext,
  state_at_server : @moonchor.Located[ServerState, Server],
  state_at_backup : @moonchor.Located[ServerState, Backup],
  key : String,
  value : Int
) -> Unit {
  let request = ctx.locally(client, _unwrapper => Request::Put(key, value))
  access_server_v2(ctx, request, state_at_server, state_at_backup) |> ignore
}

async fn get_v2(
  ctx : @moonchor.ChoreoContext,
  state_at_server : @moonchor.Located[ServerState, Server],
  state_at_backup : @moonchor.Located[ServerState, Backup],
  key : String
) -> @moonchor.Located[Response, Client] {
  let request = ctx.locally(client, _unwrapper => Request::Get(key))
  access_server_v2(ctx, request, state_at_server, state_at_backup)
}

async fn access_server_v2(
  ctx : @moonchor.ChoreoContext,
  request : @moonchor.Located[Request, Client],
  state_at_server : @moonchor.Located[ServerState, Server],
  state_at_backup : @moonchor.Located[ServerState, Backup]
) -> @moonchor.Located[Response, Client] {
  let request_at_server = ctx.comm(client, server, request)
  let request_at_backup = ctx.comm(server, backup, request_at_server)
  let response_at_backup = ctx.locally(backup, fn(unwrapper) {
    let request = unwrapper.unwrap(request_at_backup)
    let state = unwrapper.unwrap(state_at_backup)
    handle_request(state, request)
  })
  let backup_response_at_server = ctx.comm(backup, server, response_at_backup)
  let response_at_server = ctx.locally(server, fn(unwrapper) {
    let request = unwrapper.unwrap(request_at_server)
    let state = unwrapper.unwrap(state_at_server)
    let response = handle_request(state, request)
    let backup_response = unwrapper.unwrap(backup_response_at_server)
    check_consistency([response, backup_response])
    response
  })
  ctx.comm(server, client, response_at_server)
}

As before, we can write a simple choreography to test it:

async fn kvstore_v2(ctx : @moonchor.ChoreoContext) -> Unit {
  let state_at_server = ctx.locally(server, _unwrapper => ServerState::new())
  let state_at_backup = ctx.locally(backup, _unwrapper => ServerState::new())
  put_v2(ctx, state_at_server, state_at_backup, "key1", 42)
  put_v2(ctx, state_at_server, state_at_backup, "key2", 41)
  let v1_at_client = get_v2(ctx, state_at_server, state_at_backup, "key1")
  let v2_at_client = get_v2(ctx, state_at_server, state_at_backup, "key2")
  ctx.locally(client, fn(unwrapper) {
    let v1 = unwrapper.unwrap(v1_at_client).unwrap()
    let v2 = unwrapper.unwrap(v2_at_client).unwrap()
    if v1 + v2 == 83 {
      println("The server is working correctly")
    } else {
      panic()
    }
  })
  |> ignore
}

test "kvstore 2.0" {
  let backend = @moonchor.make_local_backend([server, client, backup])
  @toolkit.run_async(() => @moonchor.run_choreo(backend, kvstore_v2, server) )
  @toolkit.run_async(() => @moonchor.run_choreo(backend, kvstore_v2, client) )
  @toolkit.run_async(() => @moonchor.run_choreo(backend, kvstore_v2, backup) )
}

Abstracting Replication Strategy with Higher-Order Functions

During the double replication implementation, we encountered coupled code where server request processing, backup requests, and consistency checking were intertwined.

Using MoonBit's higher-order functions, we can abstract the replication strategy away from the concrete processing logic. Let's analyze what constitutes a replication strategy. It should encapsulate how the server processes requests using replicas after receiving them. The key insight is that the replication strategy itself is request-agnostic and should be decoupled from the actual request handling. This makes the strategy swappable, allowing easy switching between different strategies or implementing new ones in the future.

Of course, real-world replication strategies are far more complicated and often resist clean separation. For this example, we simplify the problem to focus on moonchor's programming capabilities, directly defining the replication strategy as a function determining how the server processes requests after receiving them. We can define it with a type alias:

typealias async (@moonchor.ChoreoContext, @moonchor.Located[Request, Server]) -> @moonchor.Located[
  Response,
  Server,
] as ReplicationStrategy

Now we can simplify the access_server implementation by passing the strategy as a parameter:

async fn access_server_v3(
  ctx: @moonchor.ChoreoContext,
  request: @moonchor.Located[Request, Client],
  strategy: ReplicationStrategy
) -> @moonchor.Located[Response, Client] {
  let request_at_server = ctx.comm(client, server, request)
  let response = strategy(ctx, request_at_server)
  ctx.comm(server, client, response)
}

async fn put_v3(
  ctx: @moonchor.ChoreoContext,
  strategy: ReplicationStrategy,
  key: String,
  value: Int
) -> Unit {
  let request = ctx.locally(client, _unwrapper => Request::Put(key, value))
  access_server_v3(ctx, request, strategy) |> ignore
}

async fn get_v3(
  ctx: @moonchor.ChoreoContext,
  strategy: ReplicationStrategy,
  key: String
) -> @moonchor.Located[Response, Client] {
  let request = ctx.locally(client, _unwrapper => Request::Get(key))
  access_server_v3(ctx, request, strategy)
}

This successfully abstracts the replication strategy from the request handling logic. Below, we reimplement the double replication strategy:

async fn double_replication_strategy(
  state_at_server: @moonchor.Located[ServerState, Server],
  state_at_backup: @moonchor.Located[ServerState, Backup],
) -> ReplicationStrategy {
  fn(
    ctx: @moonchor.ChoreoContext,
    request_at_server: @moonchor.Located[Request, Server]
  ) {
    let request_at_backup = ctx.comm(server, backup, request_at_server)
    let response_at_backup = ctx.locally(backup, fn(unwrapper) {
      let request = unwrapper.unwrap(request_at_backup)
      let state = unwrapper.unwrap(state_at_backup)
      handle_request(state, request)
    })
    let backup_response = ctx.comm(backup, server, response_at_backup)
    ctx.locally(server, fn(unwrapper) {
      let request = unwrapper.unwrap(request_at_server)
      let state = unwrapper.unwrap(state_at_server)
      let res = handle_request(state, request)
      check_consistency([unwrapper.unwrap(backup_response), res])
      res
    })
  }
}

Note the function signature of double_replication_strategy - it returns a function of type ReplicationStrategy. Given two parameters, it constructs a new replication strategy. This demonstrates using higher-order functions to abstract replication strategies, known as higher-order choreography in choreographic programming.

We can test it with a simple choreography:

async fn kvstore_v3(ctx: @moonchor.ChoreoContext) -> Unit {
  let state_at_server = ctx.locally(server, _unwrapper => ServerState::new())
  let state_at_backup = ctx.locally(backup, _unwrapper => ServerState::new())
  let strategy = double_replication_strategy(state_at_server, state_at_backup)
  put_v3(ctx, strategy, "key1", 42)
  put_v3(ctx, strategy, "key2", 41)
  let v1_at_client = get_v3(ctx, strategy, "key1")
  let v2_at_client = get_v3(ctx, strategy, "key2")
  ctx.locally(client, fn(unwrapper) {
    let v1 = unwrapper.unwrap(v1_at_client).unwrap()
    let v2 = unwrapper.unwrap(v2_at_client).unwrap()
    if v1 + v2 == 83 {
      println("The server is working correctly")
    } else {
      panic()
    }
  })
  |> ignore
}

test "kvstore 3.0" {
  let backend = @moonchor.make_local_backend([server, client, backup])
  @toolkit.run_async(() => @moonchor.run_choreo(backend, kvstore_v2, server))
  @toolkit.run_async(() => @moonchor.run_choreo(backend, kvstore_v2, client))
  @toolkit.run_async(() => @moonchor.run_choreo(backend, kvstore_v2, backup))
}

Implementing Role-Polymorphism Through Parametric Polymorphism

To implement new replication strategies like triple replication, we need to define two new Backup types for differentiation:

struct Backup1 {} derive(Hash, Show)

impl @moonchor.Location for Backup1 with name(_) {
  "backup1"
}

let backup1: Backup1 = Backup1::{}

struct Backup2 {} derive(Hash, Show)

impl @moonchor.Location for Backup2 with name(_) {
  "backup2"
}

let backup2: Backup2 = Backup2::{}

Next, we need to modify the core logic of access_server. An immediate problem emerges: to have both Backup1 and Backup2 process the request and return responses, we'd need to repeat these statements: let request = unwrapper.unwrap(request_at_backup); let state = unwrapper.unwrap(state_at_backup); handle_request(state, request). Code duplication is a code smell that should be abstracted away. Here, moonchor's "roles as types" advantage becomes apparent - we can use MoonBit's parametric polymorphism to abstract the backup processing logic into a polymorphic function do_backup, which takes a role type parameter B representing the backup role:

async fn[B : @moonchor.Location] do_backup(
  ctx : @moonchor.ChoreoContext,
  request_at_server : @moonchor.Located[Request, Server],
  backup : B,
  state_at_backup : @moonchor.Located[ServerState, B]
) -> @moonchor.Located[Response, Server] {
  let request_at_backup = ctx.comm(server, backup, request_at_server)
  let response_at_backup = ctx.locally(backup, fn(unwrapper) {
    let request = unwrapper.unwrap(request_at_backup)
    let state = unwrapper.unwrap(state_at_backup)
    handle_request(state, request)
  })
  ctx.comm(backup, server, response_at_backup)
}

This enables us to freely implement either double or triple replication strategies. For the triple replication strategy, we simply need to call do_backup twice within the function returned by triple_replication_strategy:

async fn triple_replication_strategy(
  state_at_server: @moonchor.Located[ServerState, Server],
  state_at_backup1: @moonchor.Located[ServerState, Backup1],
  state_at_backup2: @moonchor.Located[ServerState, Backup2]
) -> ReplicationStrategy {
  fn(
    ctx: @moonchor.ChoreoContext,
    request_at_server: @moonchor.Located[Request, Server]
  ) {
    let backup_response1 = do_backup(
      ctx, request_at_server, backup1, state_at_backup1,
    )
    let backup_response2 = do_backup(
      ctx, request_at_server, backup2, state_at_backup2,
    )
    ctx.locally(server, fn(unwrapper) {
      let request = unwrapper.unwrap(request_at_server)
      let state = unwrapper.unwrap(state_at_server)
      let res = handle_request(state, request)
      check_consistency([
        unwrapper.unwrap(backup_response1),
        unwrapper.unwrap(backup_response2),
        res,
      ])
      res
    })
  }
}

Since we've successfully separated the replication strategy from the access process, the access_server, put, and get functions require no modifications. Let's test the final KVStore implementation:

async fn kvstore_v4(ctx: @moonchor.ChoreoContext) -> Unit {
  let state_at_server = ctx.locally(server, _unwrapper => ServerState::new())
  let state_at_backup1 = ctx.locally(backup1, _unwrapper => ServerState::new())
  let state_at_backup2 = ctx.locally(backup2, _unwrapper => ServerState::new())
  let strategy = triple_replication_strategy(
    state_at_server, state_at_backup1, state_at_backup2,
  )
  put_v3(ctx, strategy, "key1", 42)
  put_v3(ctx, strategy, "key2", 41)
  let v1_at_client = get_v3(ctx, strategy, "key1")
  let v2_at_client = get_v3(ctx, strategy, "key2")
  ctx.locally(client, fn(unwrapper) {
    let v1 = unwrapper.unwrap(v1_at_client).unwrap()
    let v2 = unwrapper.unwrap(v2_at_client).unwrap()
    if v1 + v2 == 83 {
      println("The server is working correctly")
    } else {
      panic()
    }
  })
  |> ignore
}

test "kvstore 4.0" {
  let backend = @moonchor.make_local_backend([server, client, backup1, backup2])
  @toolkit.run_async(() => @moonchor.run_choreo(backend, kvstore_v4, server))
  @toolkit.run_async(() => @moonchor.run_choreo(backend, kvstore_v4, client))
  @toolkit.run_async(() => @moonchor.run_choreo(backend, kvstore_v4, backup1))
  @toolkit.run_async(() => @moonchor.run_choreo(backend, kvstore_v4, backup2))
}

With this, we've completed the multi-replica KVStore implementation. Throughout this example, we never manually used any send or recv to express distributed node interactions. Instead, we leveraged moonchor's choreographic programming capabilities to handle all communication and synchronization processes, avoiding potential type errors, deadlocks, and explicit synchronization issues.

Conclusion

In this article, we've explored the elegance of choreographic programming through moonchor while witnessing MoonBit's powerful expressiveness. For deeper insights into choreographic programming, you may refer to Haskell's library HasChor, the Choral language, or moonchor source code. To try moonchor yourself, simply install it via the command moon add Milky2018/moonchor@0.15.0.